UBOSS Portal Guide
April 2025
UBOSS Overview
The UBOSS Customer Portal provides customers with the ability to self-serve the Next Generation SIP service and Cloud Communications with Webex service.
The Colt UBOSS Customer Portal is a highly featured application which, depending on which product it is used for, provides:
- A configurable personalised homepage to show graphical views of Users, Charges, Call volume by numbers and duration,
- View and download rate cards
- View and download inventory such as Phone Numbers, Devices, Packages and Services
- Configure, view and download reports
- Schedule Reports
- Configure group services such as Hunt Groups, Call Pickups etc
- Set Business hours and Holiday schedules
- Add, Amend and Cease Users, Devices, Services, Packages and Phone Numbers
- Individual and Bulk load capability
- Configuration of Call Centre profiles
- Direct configuration of Cloud Communications with Webex users
- Provide portal access to users at various levels
- Direct ordering of hardware
- Dynamic unit-based charging integrated into Colt billing systems
Portal Users and Users
Adding a Portal Only User
A “Portal Only User” can be added at either the business level or site level to provide access to UBOSS for general administrative tasks. The level of access is determined by the level assigned to the user
Select Users from the left-hand menu

From the User screen select ![]() and then selecting Add from the options
and then selecting Add from the options
This will take you to the Add a New User wizard
In the Profile section complete the details as required selecting None as the user type
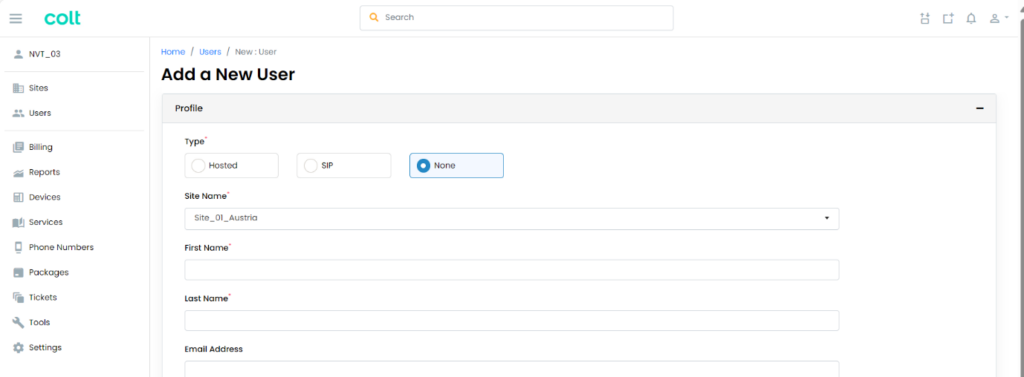
Enter the email address of the user in the Email Address field. This will be the username
From the Permissions section select the required UBOSS Access Level:
Site – provides access to the Site the user is associated to only
Business – Provides access to the whole environment
Then select a Role to determine the user permissions
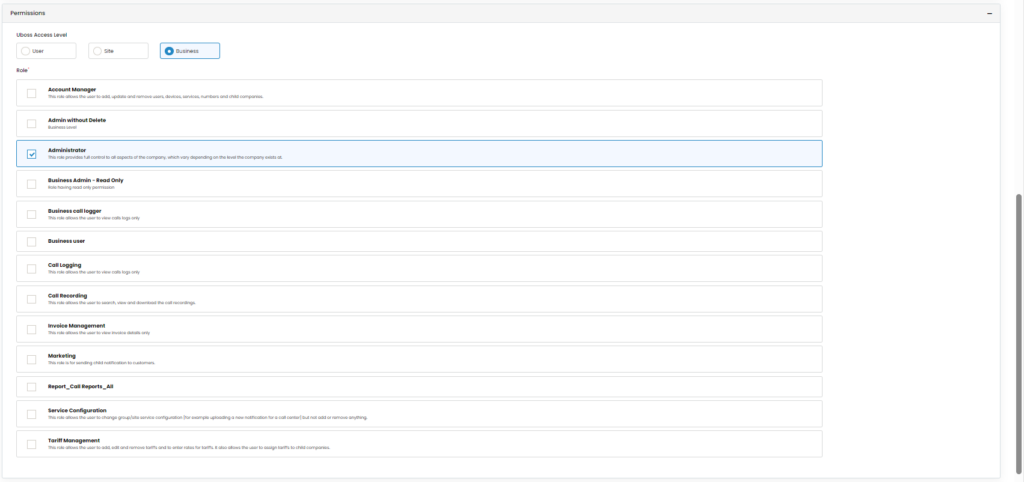
Once completed, check the details are correct and select ![]()
Once the confirmed message is received the user is assigned.
Deleting a Portal Only User
Select Users from the left hand menu to show the list of users.
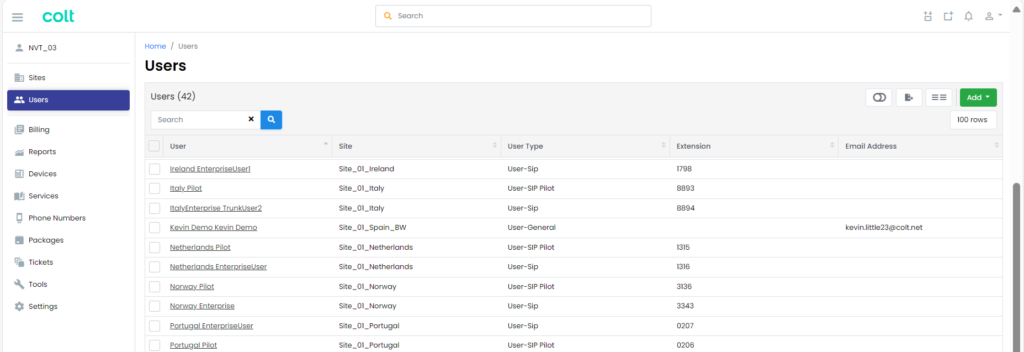
Select the user to be deleted to show the Users profile page
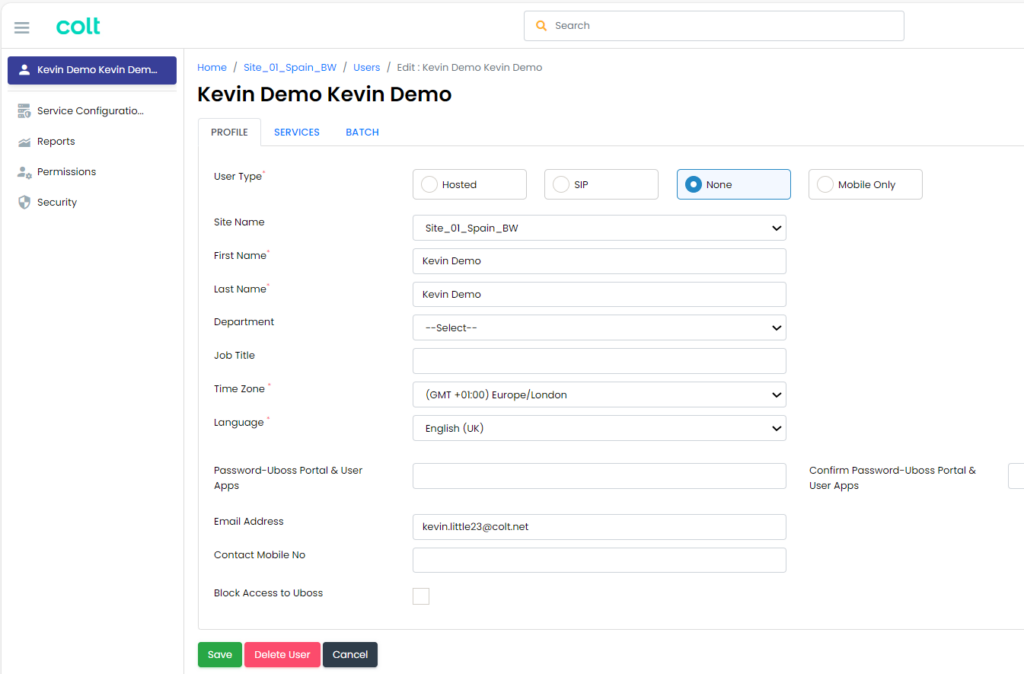
Select ![]() to remove the user.
to remove the user.
Changing the Users Portal Language
The UBOSS portal supports English, Dutch, French and Spanish languages which can be applied to a user with portal access configured.
To change the language of a user, navigate to the users Profile page by selecting the required user from the Users list.
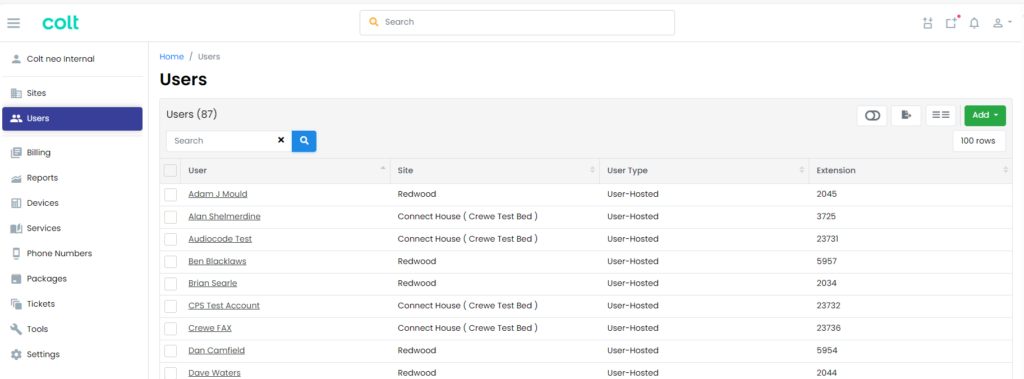
Once the user has been selected the users Profile window will appear.
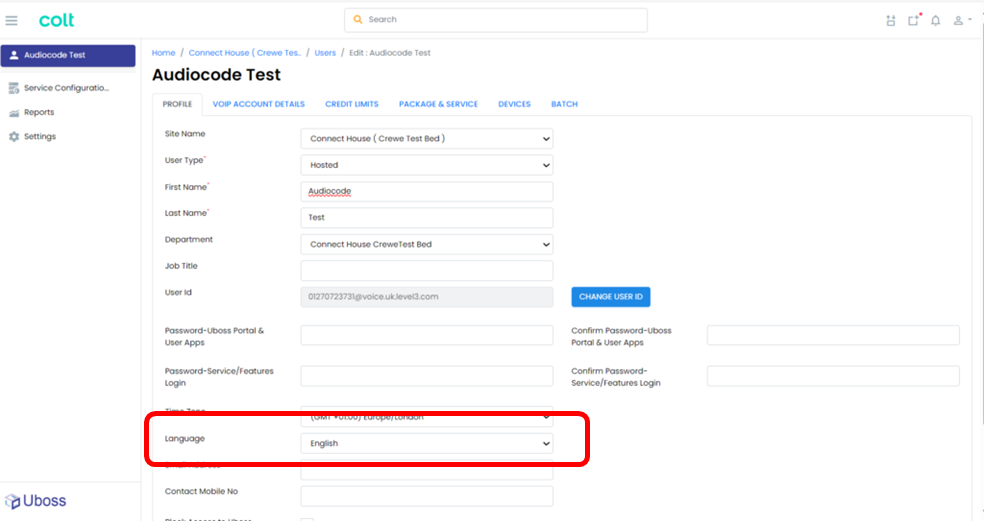
From the language dropdown select the desired language and press ![]() to confirm the language change
to confirm the language change
Passwords and PIN’s
Changing your own UBOSS password
To change your own password to access UBOSS select
’My Profile’ from the top right profile icon dropdown

From the profile page enter the password into the Password-Uboss Portal field
Then press ![]() to set the new password.
to set the new password.
Note: The new password must have a minimum of 8 characters – at least one lower case alpha, one upper case alpha, one number and one special character (!, %, @ etc).
Changing another person’s UBOSS Password
To change or reset a users UBOSS password, this can be reset by selecting Users from the left hand navigation bar and then clicking on the user required.

On the User’s Profile Page in the Password-Uboss Portal & User Apps box enter the new Login Password and Confirm Login Password
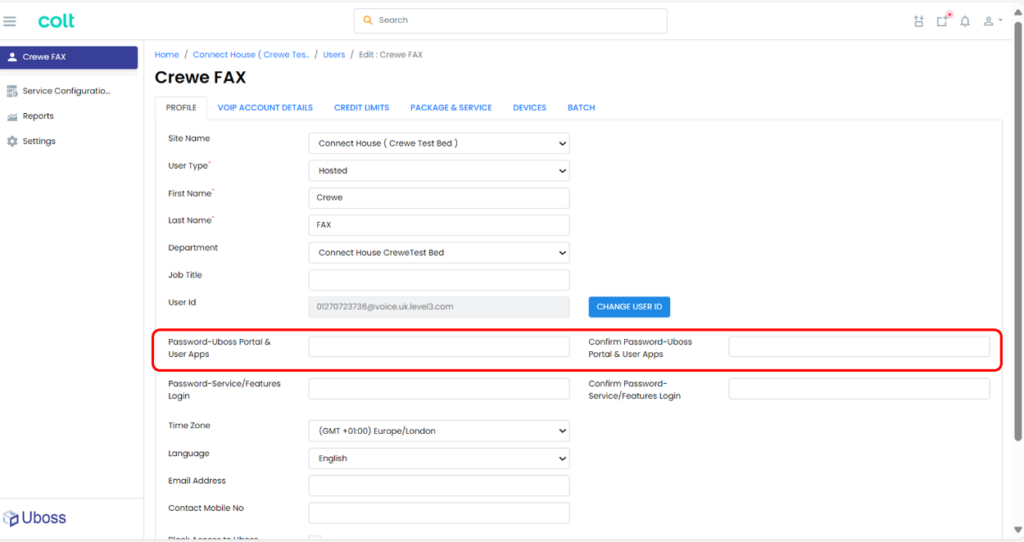
Then press ![]() to set the new password.
to set the new password.
Note: The new password must have a minimum of 8 characters including at least one lower case alpha, one upper case alpha, one number and one special character (!, %, @ etc).
Enforced Multi Factor Authentication – MFA
When MFA is switched on, at first login user will receive the following

Select ![]() to be presented with a QR code
to be presented with a QR code

Scan the QR code with an authenticator app. While the pop up recommends Google Authenticator, other authentication applications work as well.
Follow instructions in the authenticator app
When setup select ![]()
Enter the code shown by your authenticator app and press ![]()

When accepted, the recovery keys will be presented
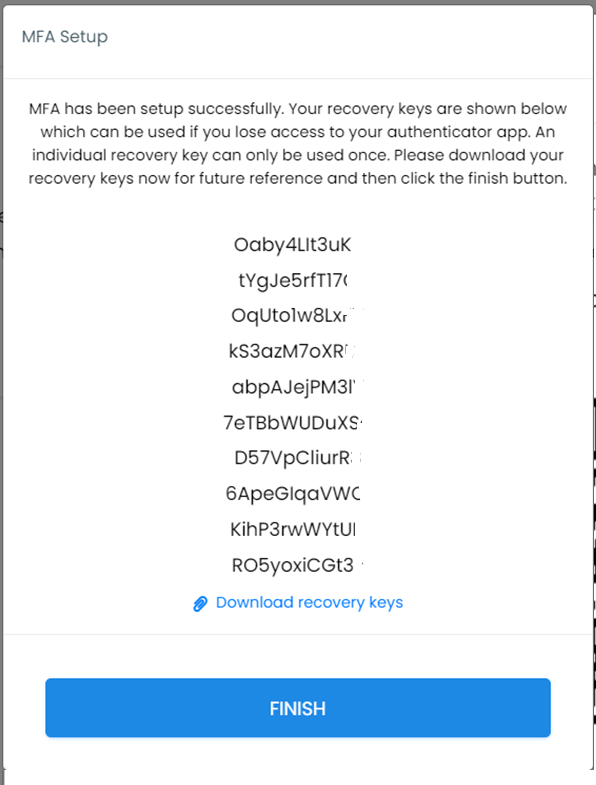
These can be downloaded to a text file for future reference. Once downloaded press ![]() At next login, after entering username and password the following MFA screen is presented.
At next login, after entering username and password the following MFA screen is presented.
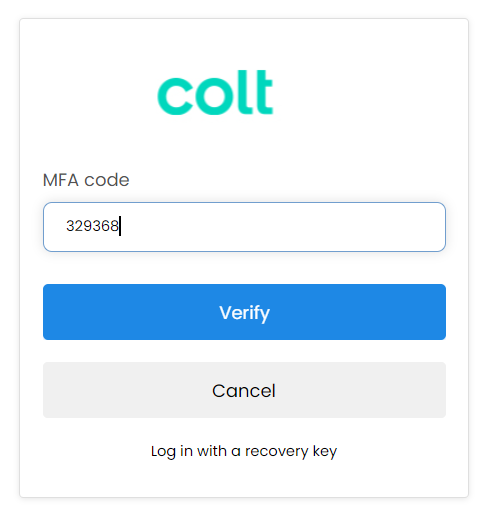
Enter the code from the authenticator app and then ![]() to complete the login.
to complete the login.
Changing passwords for accessing applications & voicemail
The applications passwords are the same as the UBOSS password. So, if a user has forgotten their login password for accessing apps such as Webex and Receptionist Console you can reset this by selecting Users from the left hand navigation bar and then clicking on the user required.

On the User’s Profile Page tab in the Password-Uboss Portal & User Apps box enter the new Login Password and Confirm Login Password
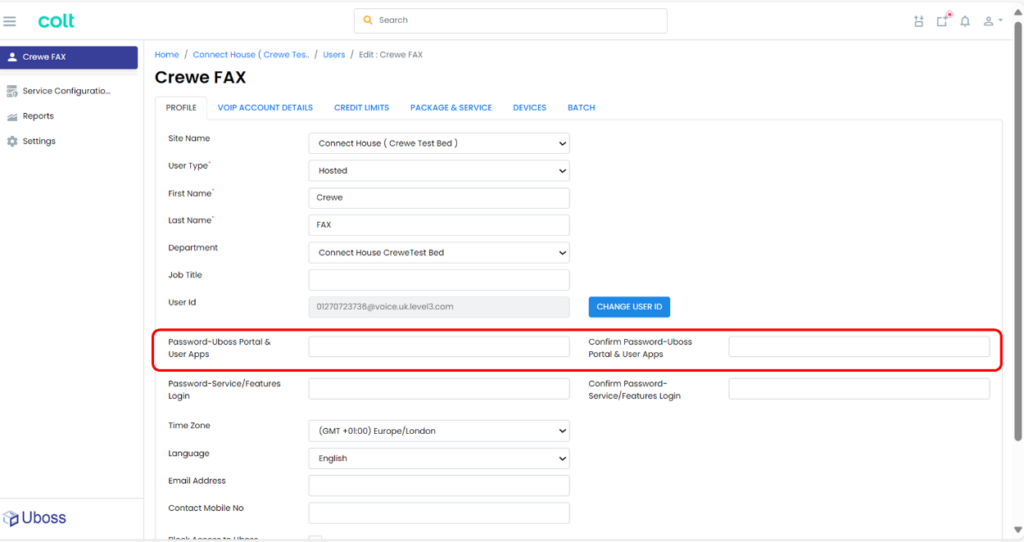
Note: The new password must have a minimum of 8 characters including at least one lower case alpha, one upper case alpha, one number and one special character (!, %, @ etc).
Changing Voicemail Pin
If a user has forgotten their Voicemail pin this can be reset by navigating to the User List and clicking on the User that requires the PIN to be changed.

Once at the user, select VOIP Account from the left hand menu and enter the required PIN into the Voicemail and Flexible Seating Password field
Note: The pin cannot contain duplicate numbers or consecutive numbers e.g. 1234. It can take up to 15 minutes for the new pin to be active.
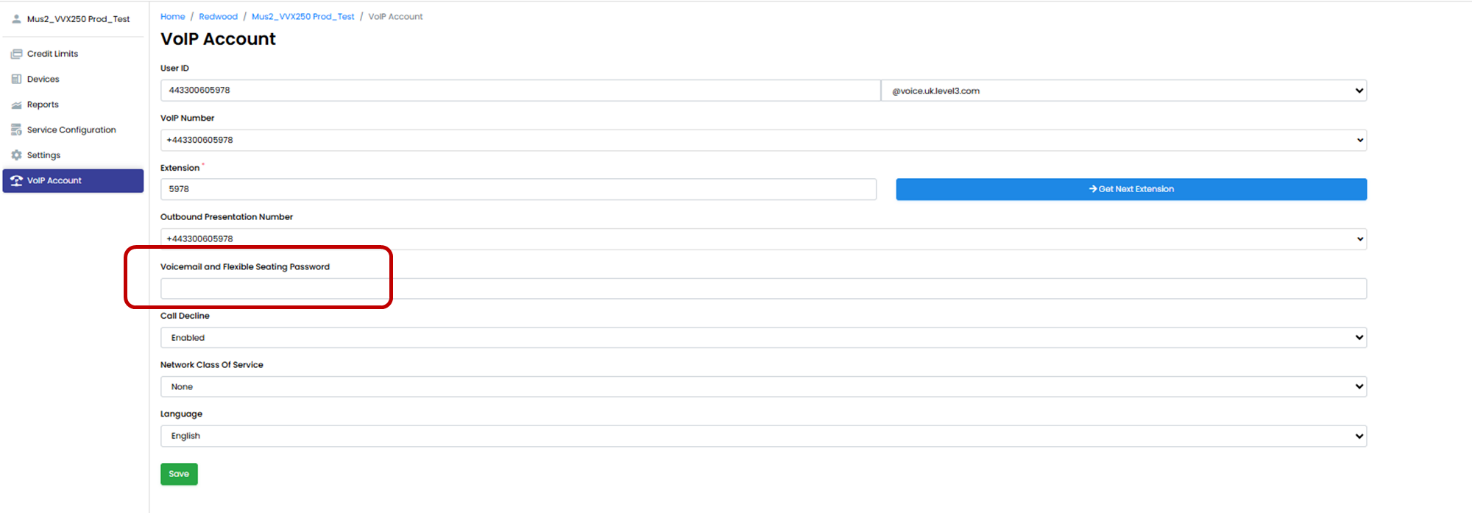
Remember to press ![]() when completed.
when completed.
Number Management
Numbers are required to be allocated to the customer environment, by Colt, for them to be able to be activated to a user\service.
Whether the numbers are associated to Cloud Communications or NGSIP together with the initial requirement will determine how the numbers have initially been allocated.
Generally, numbers associated to Cloud Communications will be allocated at the ‘Business’ level and those associated to NGSIP will be at site, or country, level. For numbers to be assigned to a user or service, they must first be made “Available” at the required site
Assign and Unassign Numbers
Changing the status of allocated numbers can be done at the top ‘Home’ level by selecting Phone Numbers from the left hand menu.

Select the number you want by ticking the box on the left hand side of the number. Then press Actions.

A pop up box will appear with the options:
- Move Numbers allows the number to be moved to a site or from a site, back to the business pool for later assignment

- Available – restores the number from On Hold to back to service
- On Hold – is the status for a number that is not currently used or is in the ‘quarantine’ state
Select the required Option and follow the on screen instructions.
Number Activation and Deactivation
Numbers need to be activated for them to function. Where a number(s) or number range are available to your business, these can be activated and deactivated at Site (or country) level. Once you’re in the Site level, on the left hand menu go to Phone Numbers.
Next to each number is an Activation Status showing you whether the number is already Active (in green) or Not Active (in red).
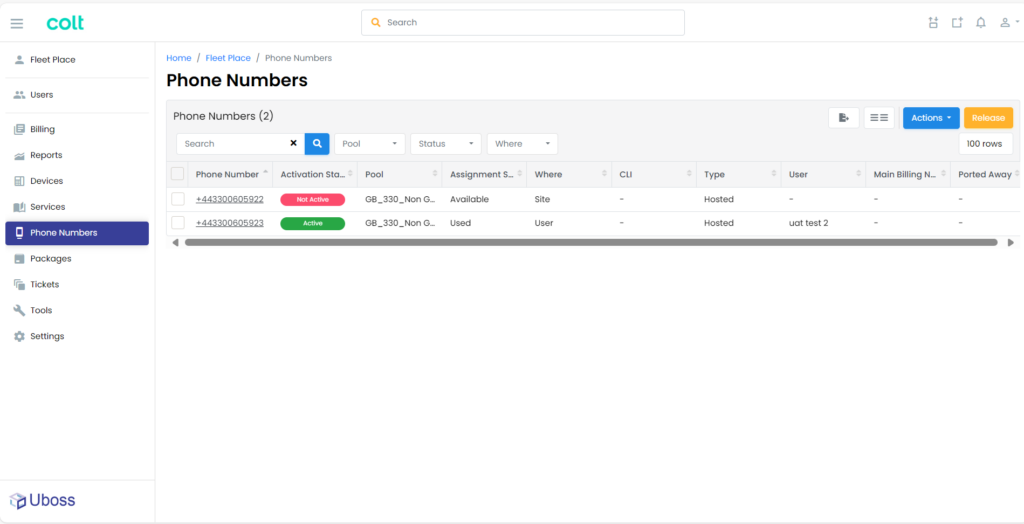
To activate a number, tick the box next to it, click the Actions button and then press Activate.
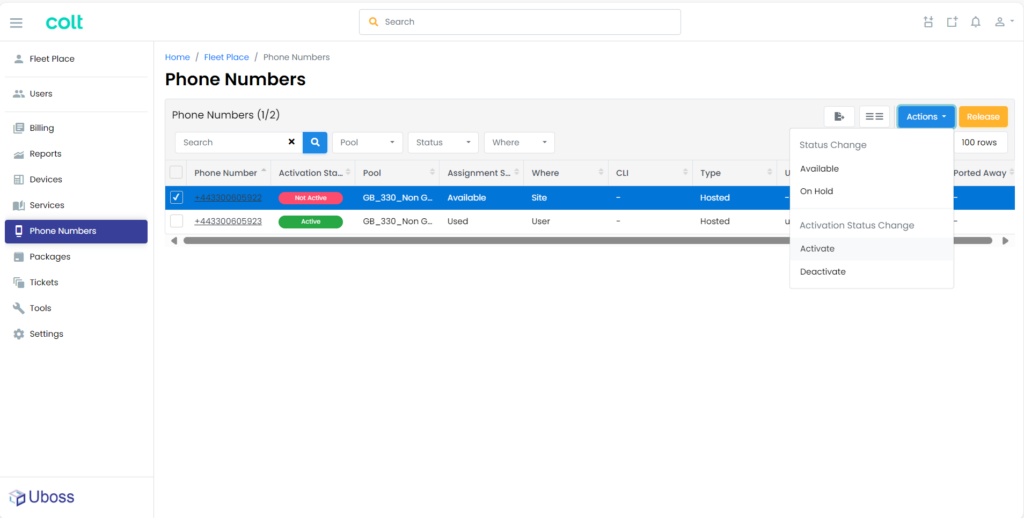
Finally, press Yes in the pop up box that appears.
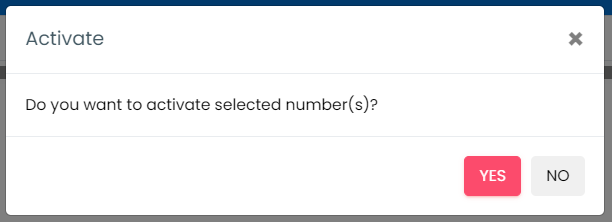
This number is now ready for use.
Hosted Users or DDI numbers
Adding a New Hosted User or DDI number
A “user” can be either a hosted user within Cloud Communications or a DDI number in NGSIP
Navigate to the site you wish to add the user\DDI number and select ‘Users’ from the menu bar

From the User screen select ![]()
This will take you to the Add a User wizard
In the Profile section complete the details as required:
- Type is either Hosted (for Cloud Communications); SIP (for NGSIP)
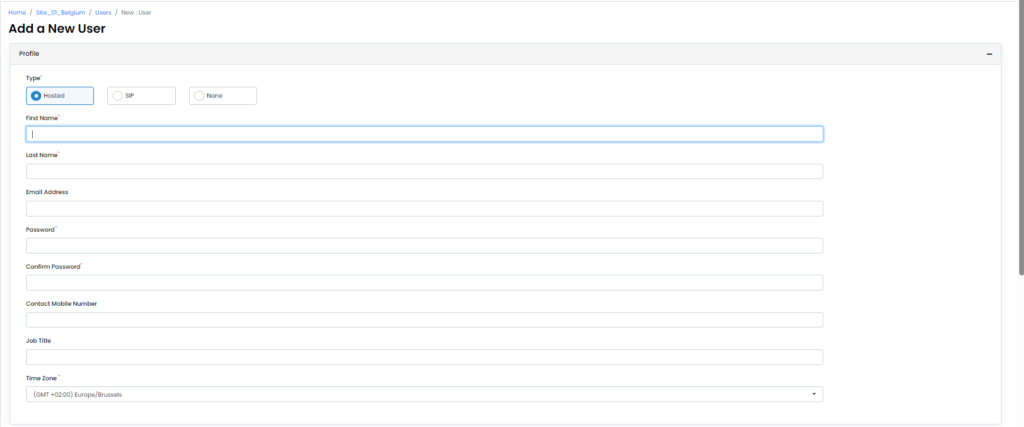
If portal access is required, enter an email address to use as the login username
- Add a password. This password is used for application access e.g. Webex, and user portal access.
Select the required Primary Package from the options, any Secondary Packages and any Additional Services required to be assigned for the user
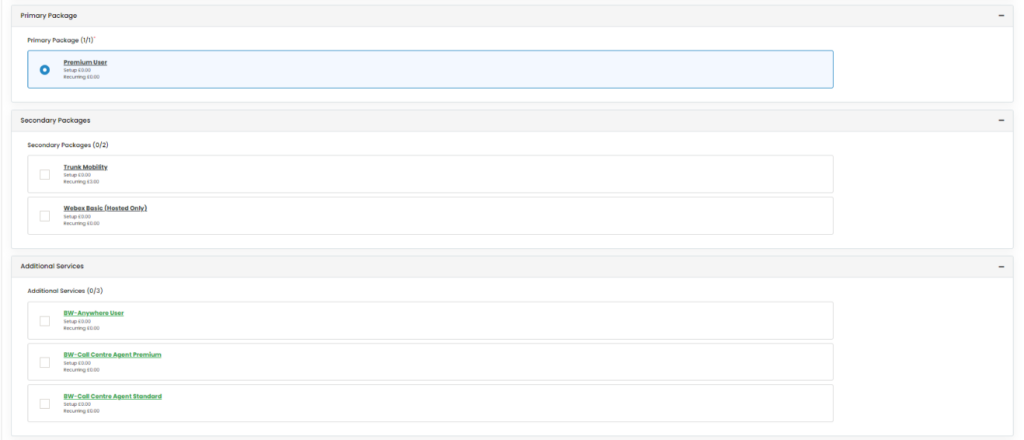
In the VOIP section, an available DDI number for the new user needs to be selected from the Phone Number drop down
DO NOT leave as Extension Only as devices will not register correctly.

When selected this will auto populate the User ID with the correct details.
Amend the extension number to reflect the required extension format.
Select the Primary Device type and add the MAC address if required. MAC address can be selected from the drop down if it has already been allocated to the site or by selecting ‘New Instance’ and typing the details into the ‘New MAC Address’ field

Once completed, check the details are correct and select ![]()
Once the confirmed message is received the user will be assigned and any related charges added to the next invoice.
Deleting User
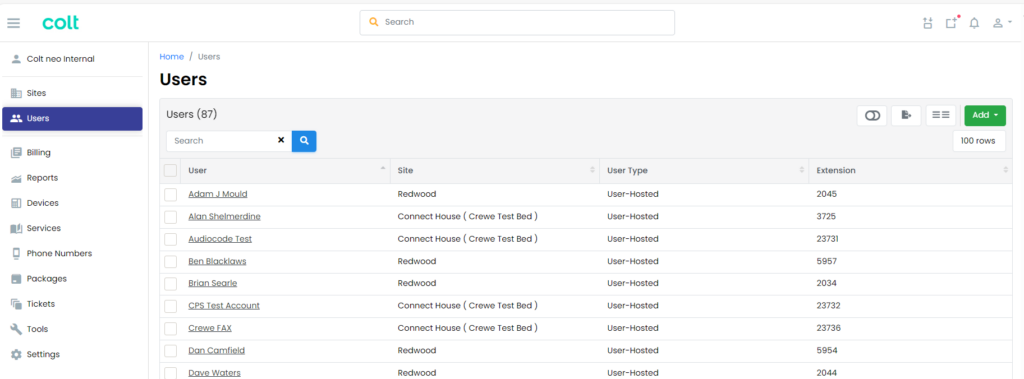
From either the business or site level select Users from the left hand navigation bar and select the user you wish to delete.
Once the user has been selected the users Profile window will appear.
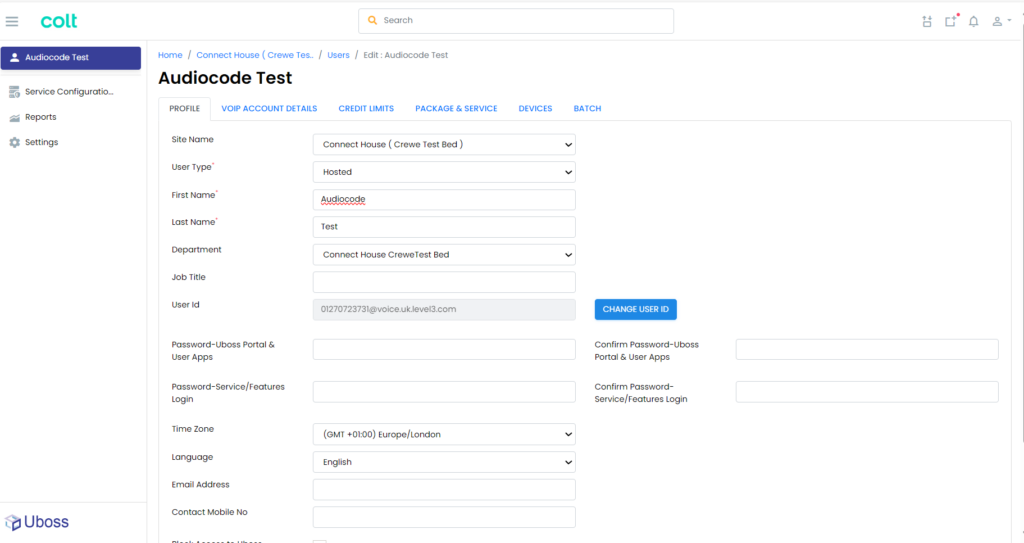
From the bottom of the page select ![]()
Select either the delete immediately or Quarantine option, setting the date for deletion if the quarantine option is selected
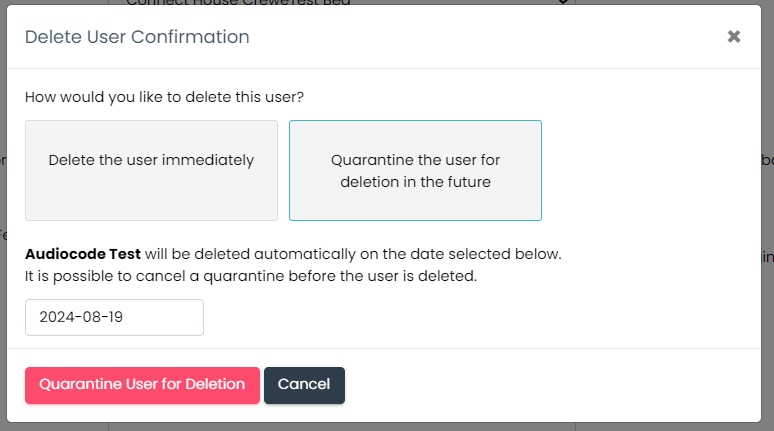
Confirm the deletion by either the ![]() or
or ![]() option to delete or place into quarantine.
option to delete or place into quarantine.
Devices
Devices or End Points are assigned to users to allow services to be accessed. Devices can be handsets, conference phones, analogue gateways (ATA’s), DECT, Webex or mobile.
Users can be assigned multiple devices allowing them to switch between devices to suit their needs at any given time.
Devices can only be from the approved list for connection to the service.
Adding a Device
Navigate to the user that requires a device to be added and select Devices from the left-hand navigation
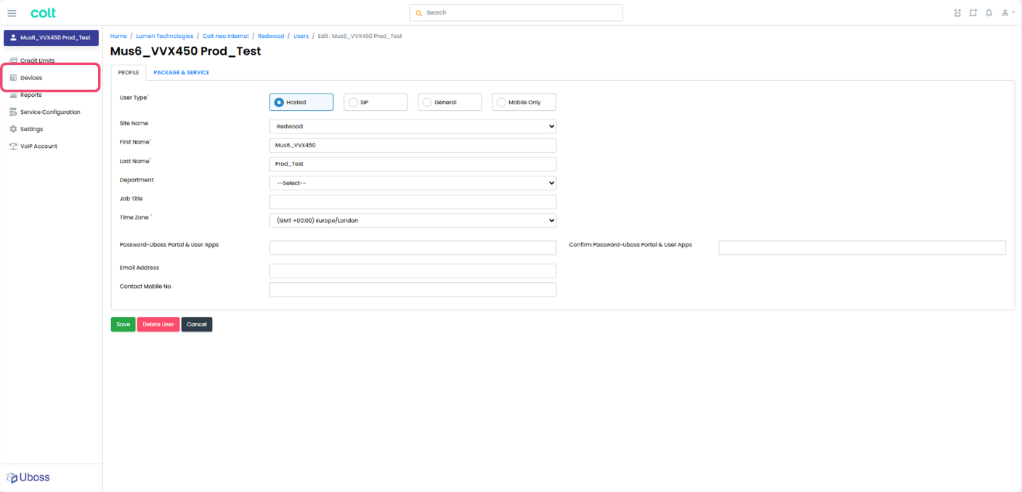
Select to be taken to the Add Device screen
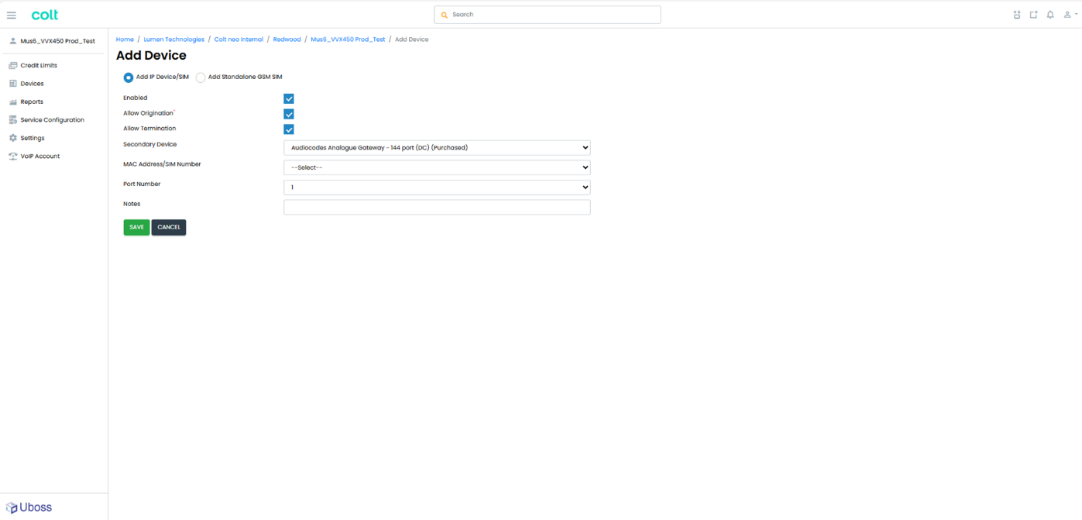
Select the device type to be added from the approved devices in the device dropdown
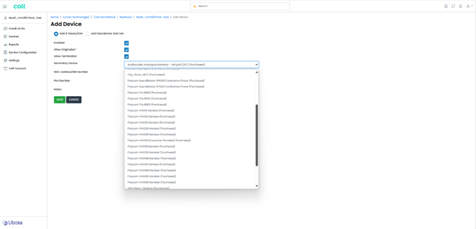
Apply the device MAC address.
If the device has been pre-registered the MAC address will be selectable from the MAC Address dropdown. If it doesn’t appear then select ‘New Instance’ and add the MAC address into the ‘New MAC address’ field.
The device MAC address can usually be found on the reverse of the device.
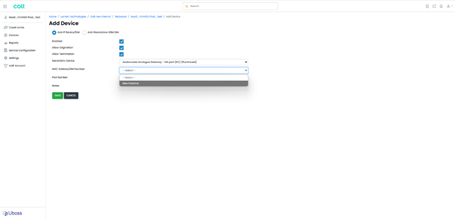
If the device selected is a multi port device e.g. an Audiocodes ATA, then select the required port from the ‘Port Number’ dropdown.
The port number is the corresponding port number of the device.
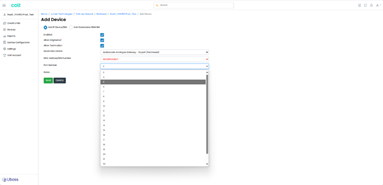
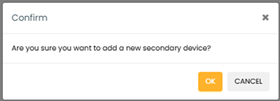
If all the required fields are correct the device will be saved and added to the user
Removing a Secondary Device
To remove a Secondary device, select the Ellipsis () next to the device that is required to be removed.

Select ‘Delete’, then OK from the confirmation Pop Up box
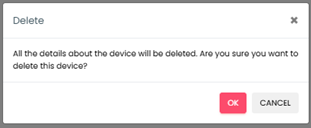
The device will now be removed from that user and available for reallocation if required.
Converting a Secondary Device to Primary
To convert a Secondary device to a Primary device, select the Ellipsis () next to the device that is required to be moved.

Select ‘Set As Primary Device’, then from the confirmation Pop Up box
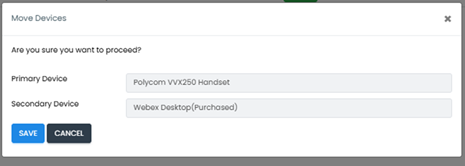
The device will now be the primary device for that user with the former primary device moving to a secondary allowing it to be removed.
Removing a Primary Device
When there is only a primary device associated, select the Ellipsis () next to the device that is required to be removed.

Select ‘Change Primary Device’ from the options
In the Change Primary Device pop up, select “No Primary Device”
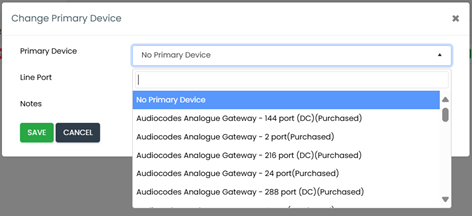
Select to remove the device.
Changing Device Settings
Depending on the device type, various settings can be changed through the portal. Such settings include, call recording, call centre, hot desking, Wi-Fi enablement etc.
To view and change the device settings, select the relevant device to view the device details. Select the required setting tab from those available.
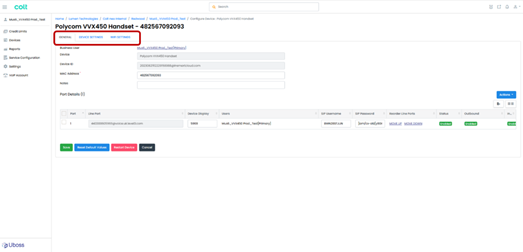
Select the required setting and for the setting to be updated.

Note: Some settings will require the device to be rebooted for the settings to be updated on the device.
Setting Wi-Fi
Where a device supports Wi-Fi e.g. Poly VVX450, this can be enabled through the Wi-Fi Settings tab.
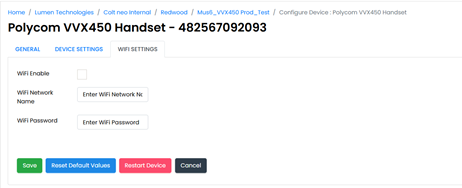
Simply select the Wi-Fi Settings tab, enter the Wi-Fi Network Name (SSID) and the Wi-Fi Password into the fields and select .
Reboot the device for the settings to take effect.
Hunt Groups
Adding a Hunt Group
A Hunt Group is a ‘group service’ rather than a package and required to be assigned at Site level, but still allows users from other sites to be assigned to the group.
Select ‘Sites’ from the left-hand navigation bar and then select the site you require.
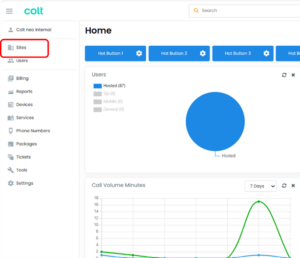
Then from the navigation bar select ‘Services’
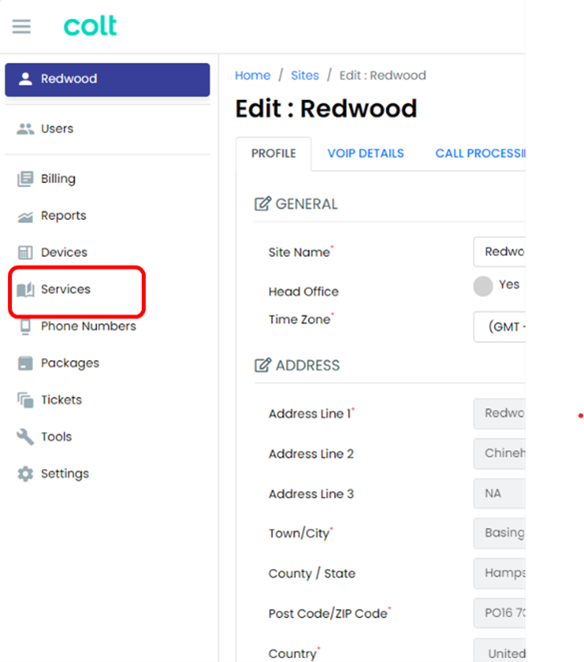
Select ![]()
Select the Hunt Group from the Service drop box
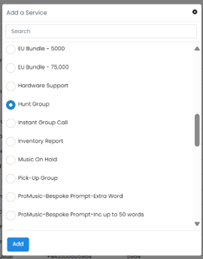
Select ![]()
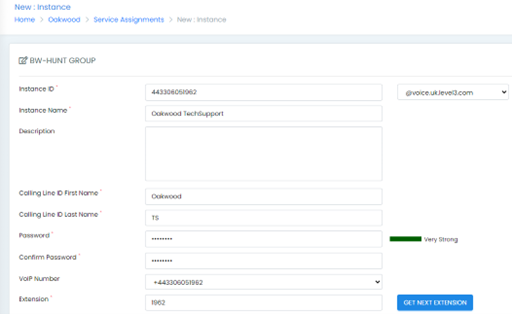
Populate the required fields. The following are mandatory fields
- Instance ID – this is normally the telephone number to avoid conflicts with other users
- Instance Name – a recognisable name so that it can be easily searched
- Calling Line ID First Name – will indicate which Hunt Group the call is coming in on
- Calling ID Last Name – will indicate which Hunt Group the call is coming in on
- Select the VoIP Telephone number or extension only
- Extension number for the Hunt Group – This must be of the correct number length for the business
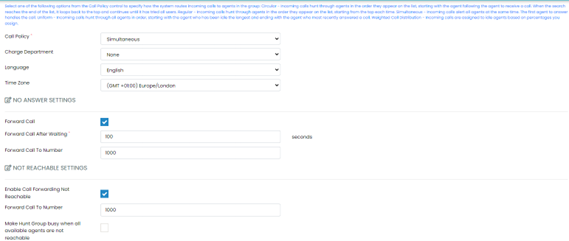
Select the ’Call Policy’ from the drop down box – Regular, Circular, Simultaneous or Uniform and this will dictate how the calls are delivered (a full description of each type is given in the blue text).
Insert Charge Site and Charge Department as required.
The ’No Answer Settings’ can be set to forward calls to another internal or external number, a mobile or voicemail (which would need to be set up as a service on the Hunt Group). If zero is left in the box then the calls will continue to ring out on the Hunt Group number.
The ’Not Reachable Settings’ allow calls to be forwarded to an alternative number e.g. in the event of a power loss.
Remember that call charges will be incurred for any calls that are forwarded to an external number or mobile.
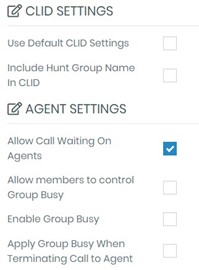
Select the appropriate CLID (Caller Line ID) and Agent Settings (if you have Call Center Agents).
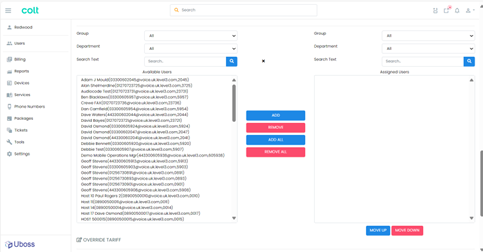
Now you are ready to add users to the Hunt Group. Click on the user in the left hand box and then press ![]() . To add the user to the group. ’Add All’ can be used if all listed users are to be included in the group.
. To add the user to the group. ’Add All’ can be used if all listed users are to be included in the group.
It is possible to select multiple users by holding down the Ctrl key on the keyboard while selecting each user. The ![]() button is used to add all those selected.
button is used to add all those selected.
Scroll down to the end of the page and press ![]() .
.
The Hunt Group is now active.
Pickup Group
Adding a Pickup Group
A Call Pick Up Group is added at a site level, so to add, select ‘Sites’ from the left-hand navigation bar and then select the site you require.

Then from the navigation bar select ‘Services’

Select the PICK-UP GROUP from the Service drop box

Select ![]()
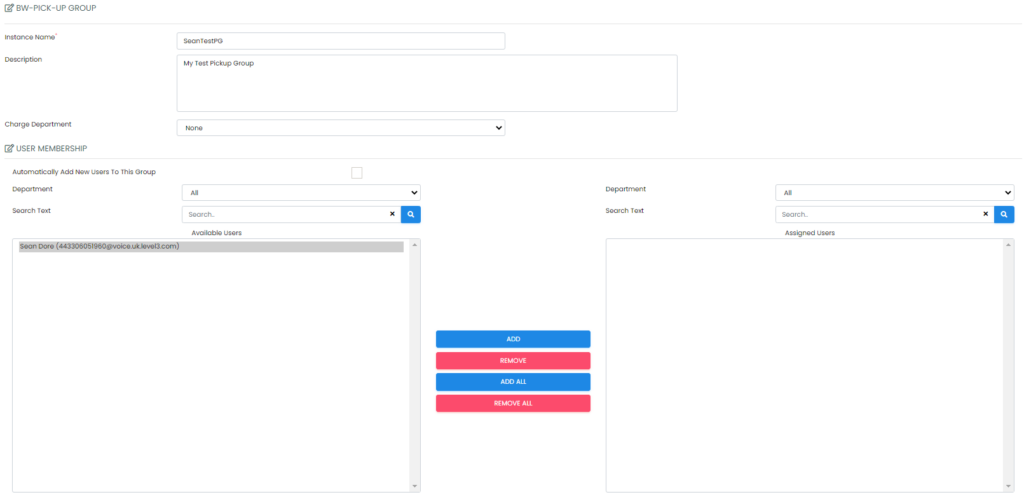
Complete the Instance ID and Description

Scroll down and then select the available users you want to add from the drop down box and press ![]() . Their name will then appear in the right hand box as shown below. If you want to add all users, then just press
. Their name will then appear in the right hand box as shown below. If you want to add all users, then just press ![]() .
.
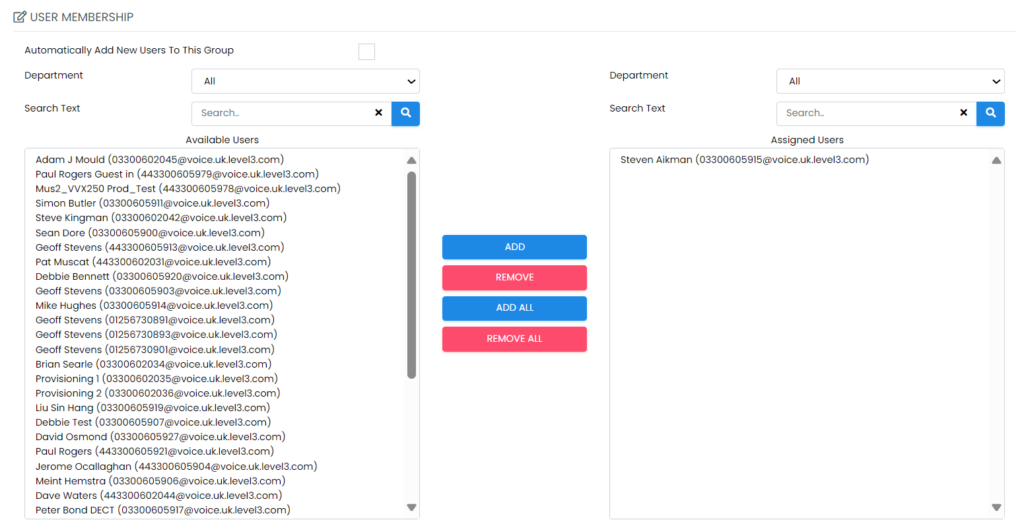
To remove users, highlight the user you wish to remove and press ![]()
Scroll down to the end of the page and press ![]() . The Call Pickup Group is now active.
. The Call Pickup Group is now active.
When a user is within a Pick Up group they can answer a call for another user within the same pick up group by dialing *98 from their device. This will pick up the longest ringing extension in the group.
Auto Attendant
Adding an Auto Attendant
If the Auto Attendant is required to be reached from an external caller, ensure a number is assigned at site level. For more detail refer to the Number Assignment guide
An Auto Attendant is assigned at Site level.
Select ‘Sites’ from the left-hand navigation bar and then select the site you wish to assign the Auto Attendant.
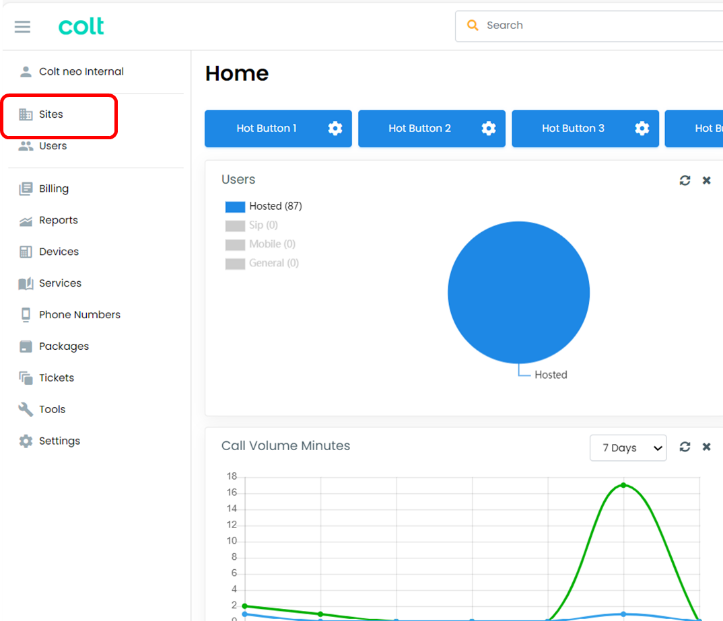
Then from the navigation bar select ‘Services’

Select ![]()
Select either Auto Attendant – Multi Level or Auto Attendant – Single Level from the Service drop box
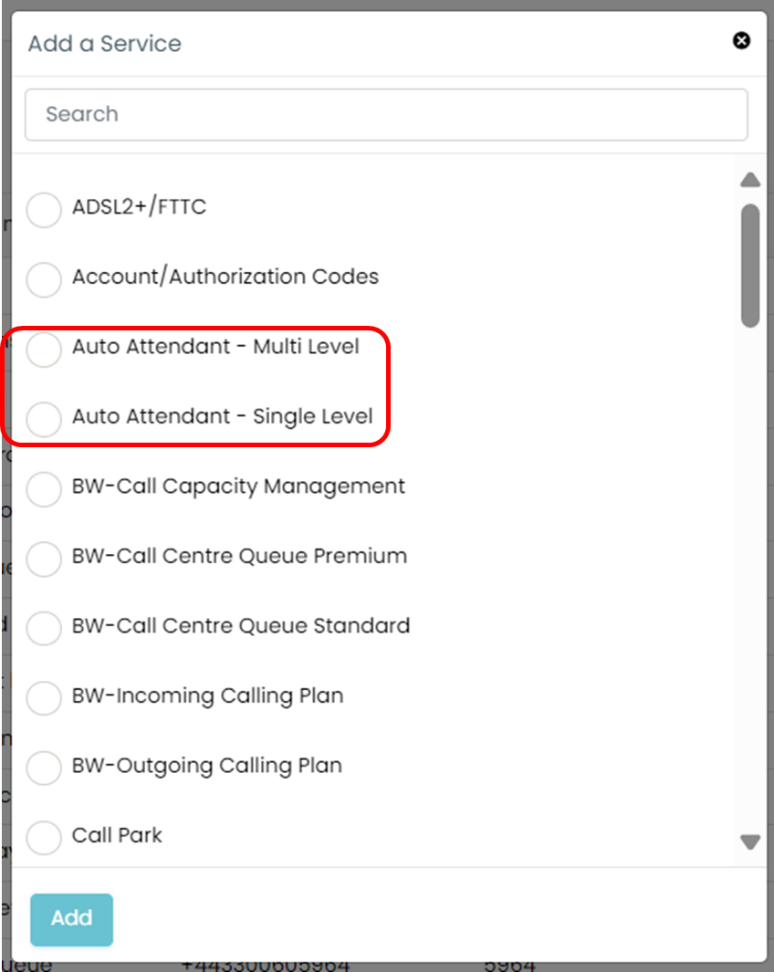
Select ![]()
Complete the fields as required ensuring the mandatory fields (*) are completed
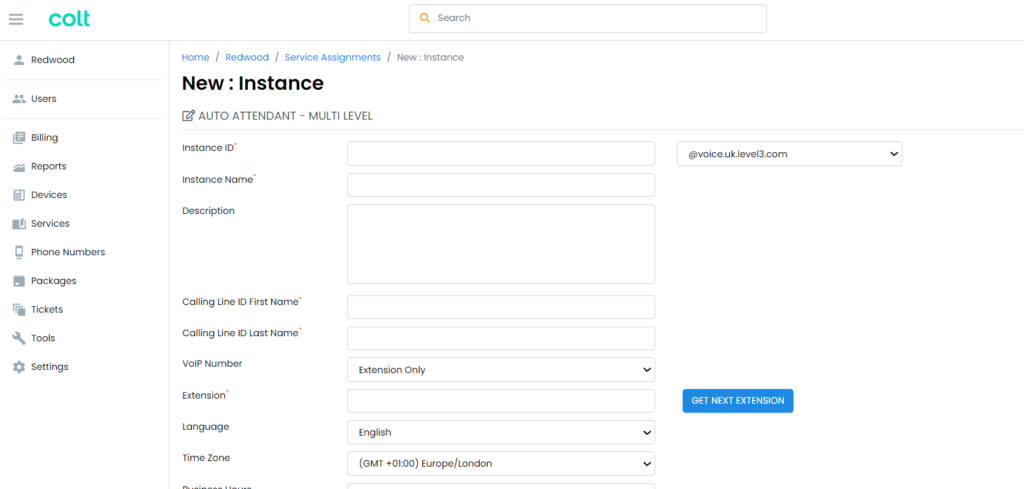
Where:
- Instance ID – this is normally the telephone number to avoid conflicts with other users
- Instance Name – the name by which you wish the Auto Attendant to be known
- Description – is not a mandatory field but can be used to help identify what it is used for
- Calling Line ID First Name – will indicate Auto Attendant number the call is coming in on.
- Calling Line ID Last Name – will indicate Auto Attendant number the call is coming in on.
- Select the VoIP Telephone number or extension only
- Extension number for the Auto Attendant.
Check that the Language and Time Zones are correct.
For ‘Time Schedule’ if you don’t want to set any opening/closing hours, this can be left as ‘Every Day All Day’.
If you do want to have different routing for after hours, when you set a Time Schedule it needs to be set with your opening hours.
For ‘Holiday Schedules’ please see the guide on Setting Holidays & Out of Hours service.
Now press ![]()
Configuring your Auto Attendant
Once the Auto Attendant has been set up you will need to go back into the service to set the call routing.
In ‘Service Assignments’ select the new Auto Attendant you have just built.
From the top tabs, select ‘Business Hours’. On this screen you need to enter what happens to calls during business hours when the caller presses 1, 2, 3 etc.
Calls can be sent to individual extension numbers, hunt groups, call queues, voicemail, recorded announcements and even external numbers (remember you are charged the cost of the call when it’s sent to an external number).
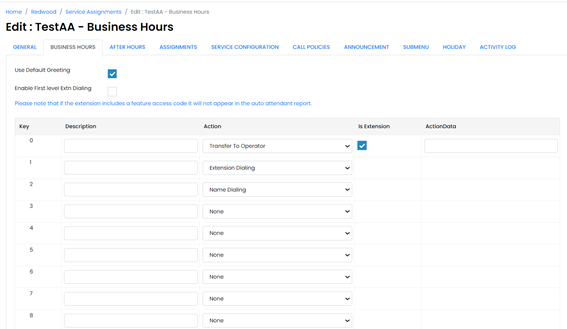
If you want a personal greeting to be played, upload this into the Announcement repository (you can easily record your greeting on any smart phone and upload to your desktop).
Then uncheck the ‘Use Default Greeting’ and select the required greeting from the drop down box. If you want callers to be able to dial someone if they know their extension, tick the ‘Enable First level Extn Dialing’ box.
If you want one of the options to forward calls to voicemail, the phone number needs to be *55xxxx where xxxx is the extension number of the voicemail box you want to divert to. This may be an individual’s voicemail but you can also set up a voicemail just for the Auto Attendant.
You can add the service in the ‘Assignments’ tab.
Repeat this for the ‘After Hours’ tab if required.
The ‘Service Configuration tab details all the services allocated to the Auto Attendant. If you want to add anything just tick the corresponding box and press Save.
The ‘Service Configuration’ tab allows you to configure the services you have selected e.g. voicemail, call forwards, pre-alert announcement.
The ‘Call Policies’ tab allows you to customise how you want the CLI to present. Most people generally leave the default settings.
In ‘Announcement’ you can upload your personalised welcome greeting and any announcements you want the callers to hear depending on the options given.
The ‘Activity Log’ shows you any changes that have been made to the AA, who has carried these out and the date.
Announcement formats and settings
WAV file format
the .wav file should be in the following format:
- CCITT, u-law, or a-law codec
- 8kHz
- 8 bit mono
- .wav file type
Audio Length Restrictions
- The maximum audio length is 2 minutes for a Voice Mail Greeting and Custom Ringback Tones
- The maximum audio length is 10 seconds for user’s Voice Mail Portal Personalized Name.
- The maximum audio length is 10 minutes for the Music On Hold greeting.
- For all other services, including auto-attendant, the maximum audio length is 5 minutes.
Trunk User – Mobility Feature Package
The Trunk Mobility Feature package is a chargeable add on to a SIP DDI number. It allows for the call forwarding, simultaneous ring and sequential ring features to be applied to an individual SIP DDI number.
Adding Mobility Feature Package to Trunk User
To add and amend the mobility feature, navigate to the user page for the required number and select Package & Service.
Within the Packages – Secondary section, the Trunk Mobility package needs to be ticked for it to be available
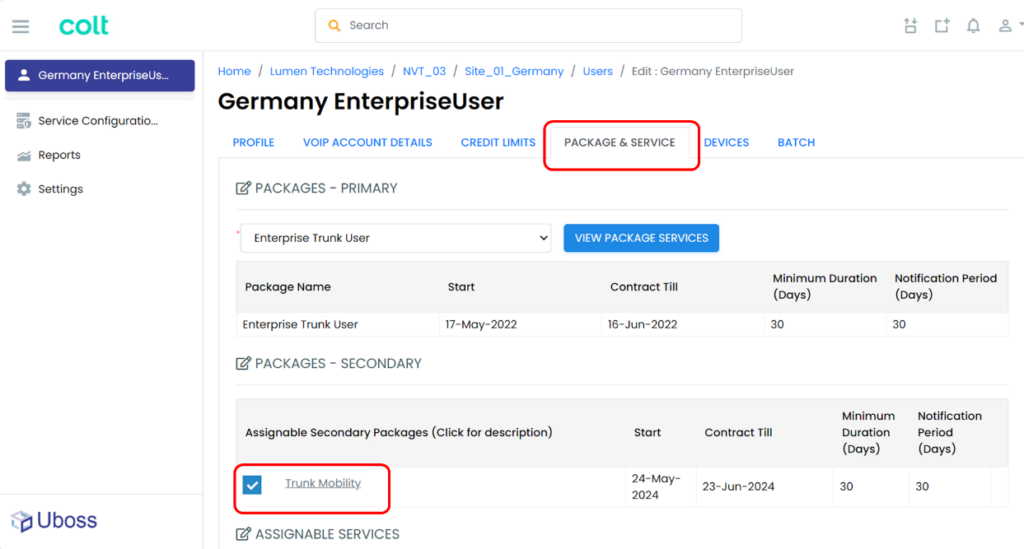
To add this to a user simply click the check box next to the service and click ![]()
To set or amend the configuration, select Service Configuration from the left hand menu bar
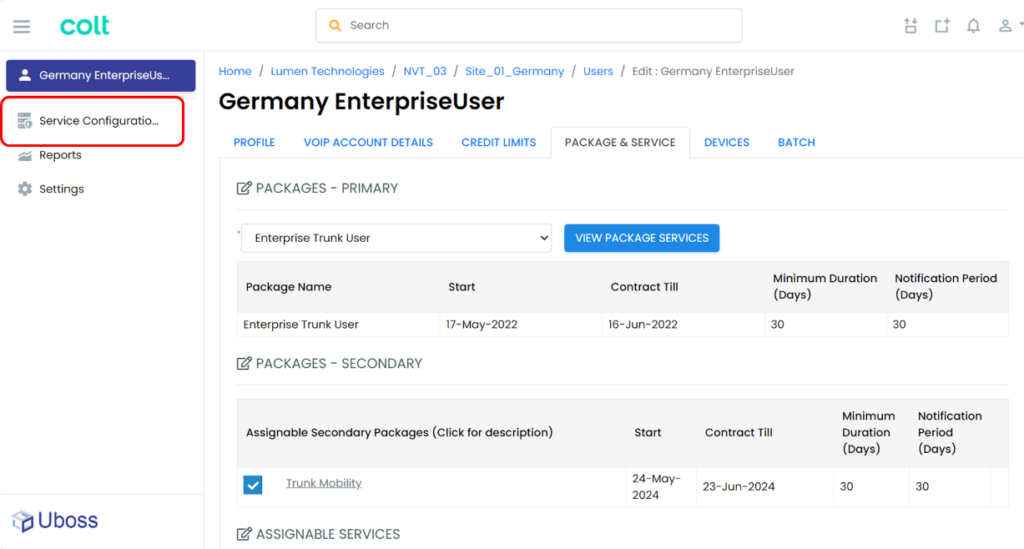
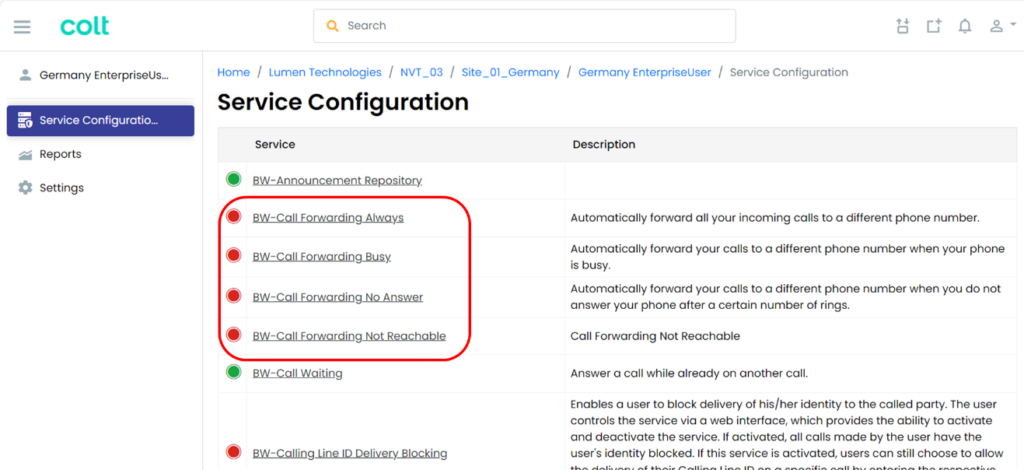
This will take you to the services (features) that are assigned and configurable. Select, the required service to amend
Enter the details as required and check the Enabled box, then select ![]()
The feature will then be active
Call Forwards
Setting Call Forwards
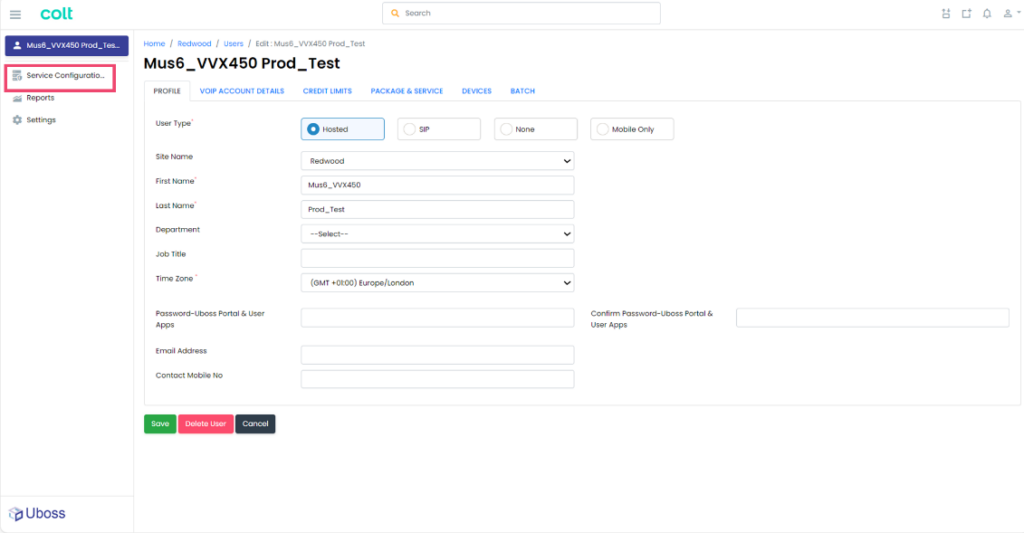
Select Users from the left-hand navigation bar and select the user call forward is to be set
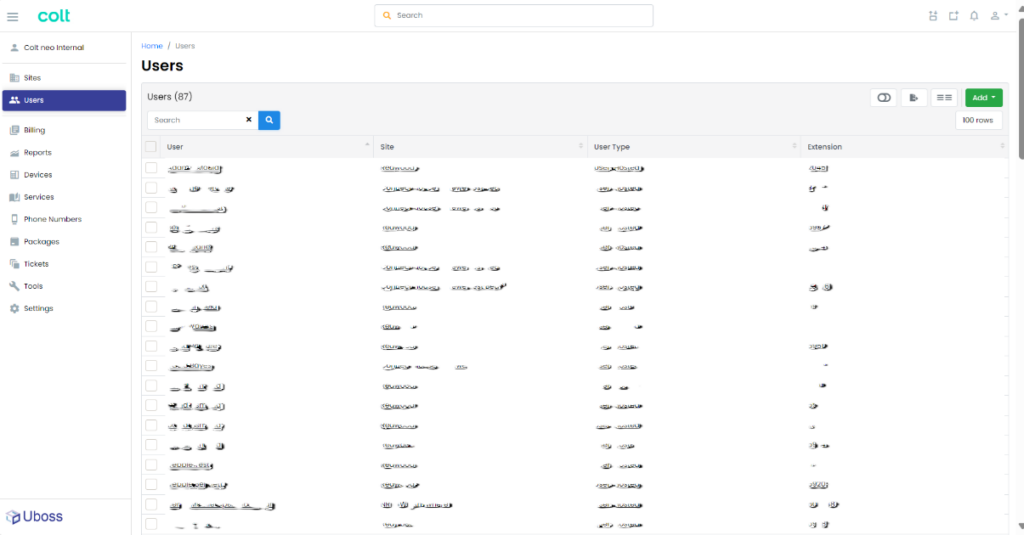
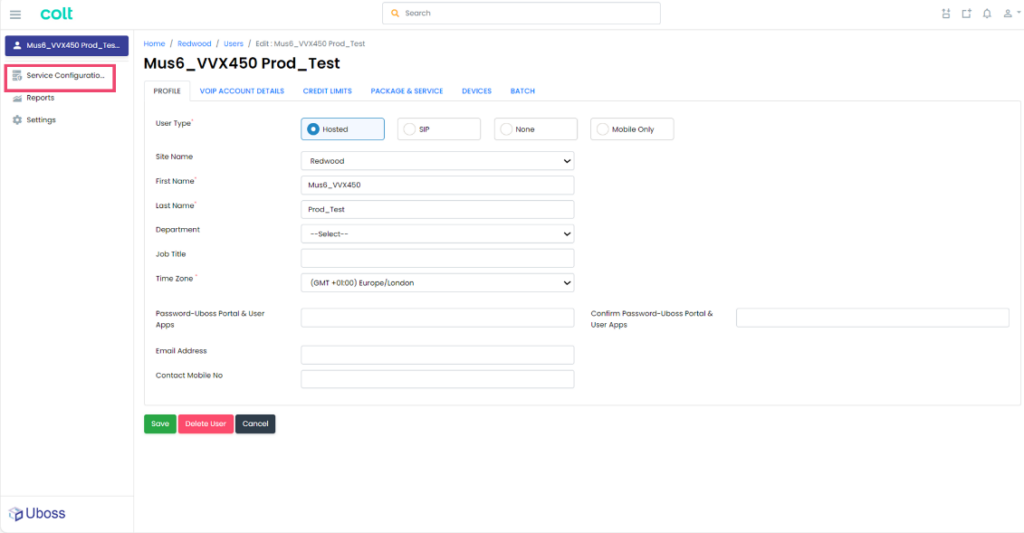
Select Service Configuration from the left hand navigation
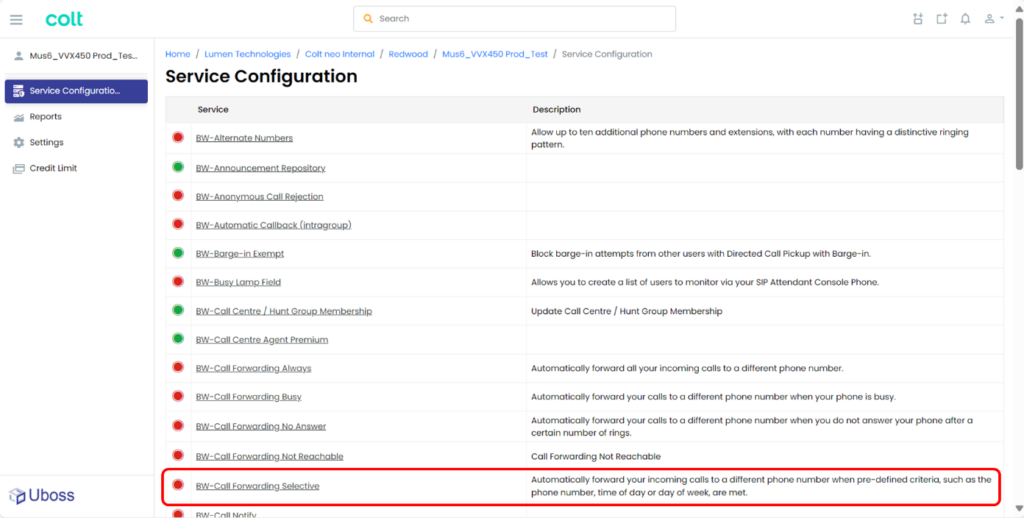
The services available to the selected user are displayed. A red button means the service is inactive, green means active.
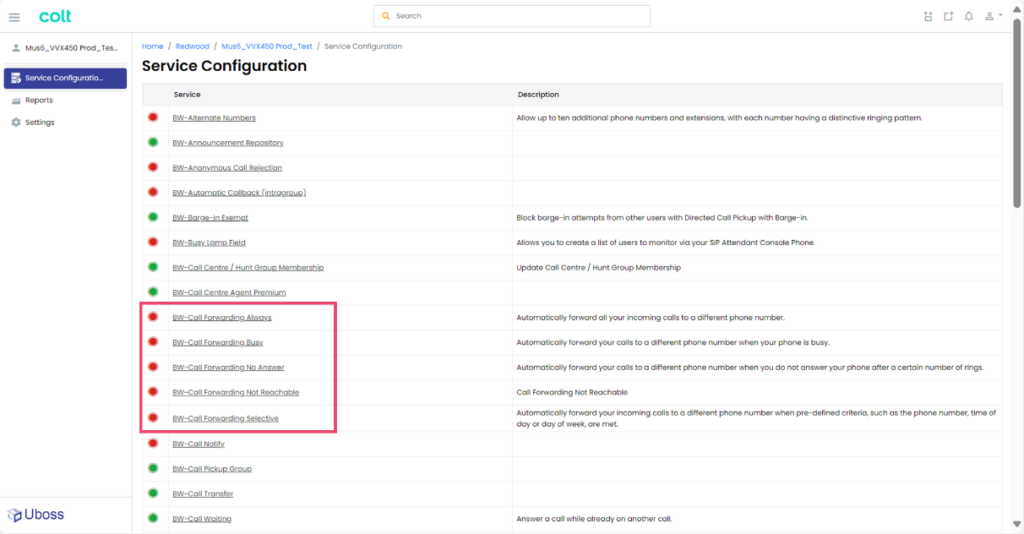
Select the call forwarding option that is required to be changed.
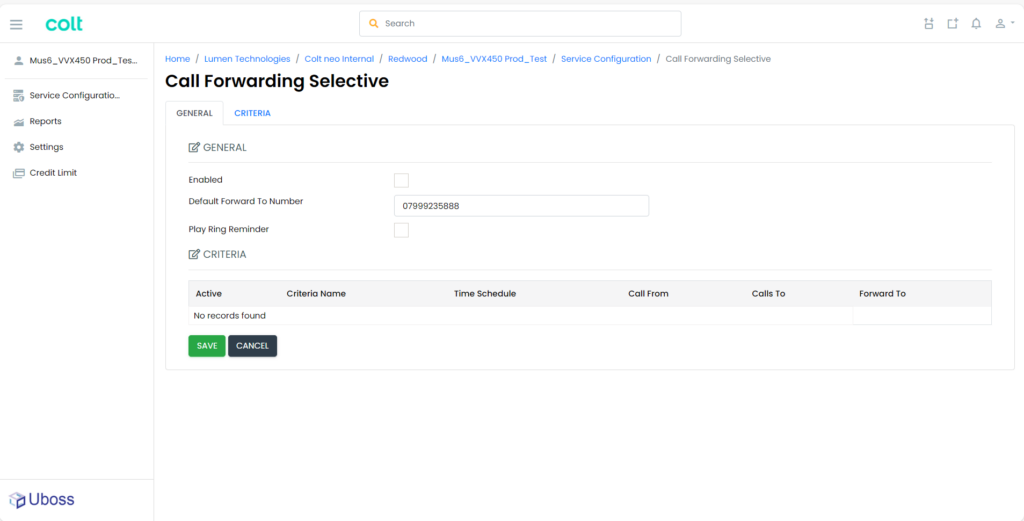
Enter the telephone number that calls should be forwarded to and check the ‘Enabled’ box to activate the service. (To deactivate the service simply uncheck the ‘Enabled’ box).
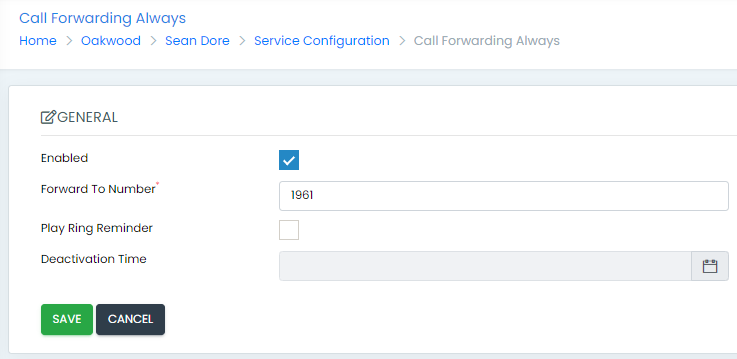
Press ![]() and the service is active immediately.
and the service is active immediately.
Setting Call Forwards to Voicemail
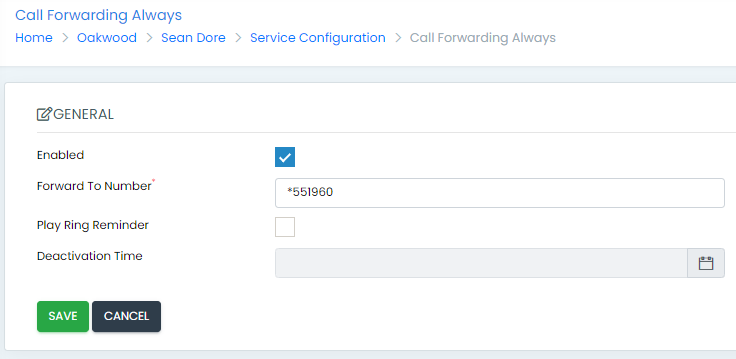
To forward calls to voicemail the ‘Forward to Number’ should be *55 followed by the extension number of the user.
Setting Call Forward Selective
When configured, Call Forwarding Selective will selectively forward calls to another destination based on the inbound number, number type and time of day.
Navigate to the user that requires Call Forward Selective to be configured and select Service Configuration from the left hand navigation
Select the Call Forward Selective option.
Enter the number for call to be forwarded to, check the ‘Enabled’ box and select ![]() to activate the service.
to activate the service.
Call Forwarding Selective Criteria
It is possible to apply criteria, whether that be determined by a schedule or telephone number, to determine whether the incoming call follows the call forward settings or not. By default, all calls will follow the settings all of the time but to change, select the Criteria tab
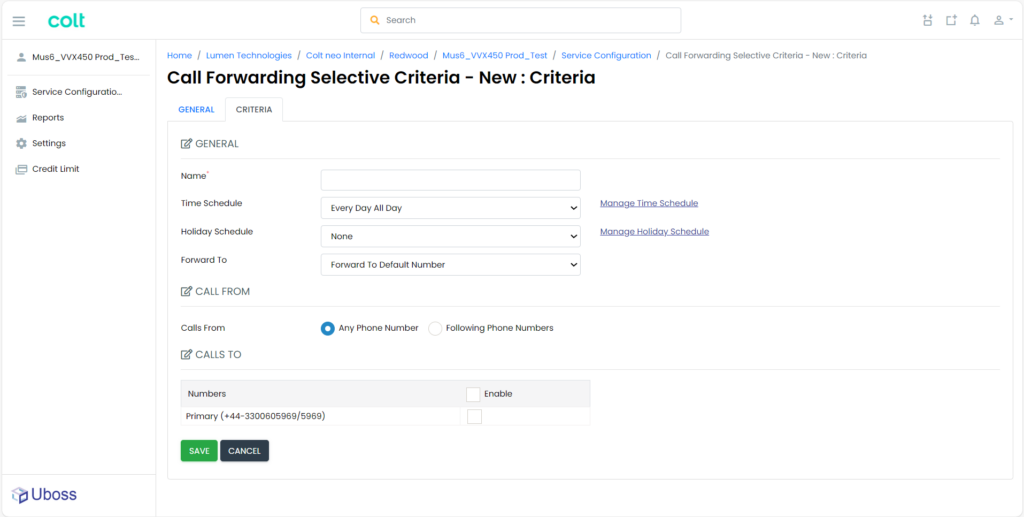
Enter a friendly name and amend the options as required.
Refer to Setting Schedules for details of how to create schedules
When completed select ![]() for the settings to be applied.
for the settings to be applied.
Applying Trunk Group Level Call Forward
Applying a call forward at the trunk group level will forward all calls delivered to that trunk group, regardless of called DDI for example, in a Disaster Recovery scenario.
To apply a Trunk Group level call forward, navigate to the Services menu from the left hand navigation and select the required Trunk Group to apply the call forward to
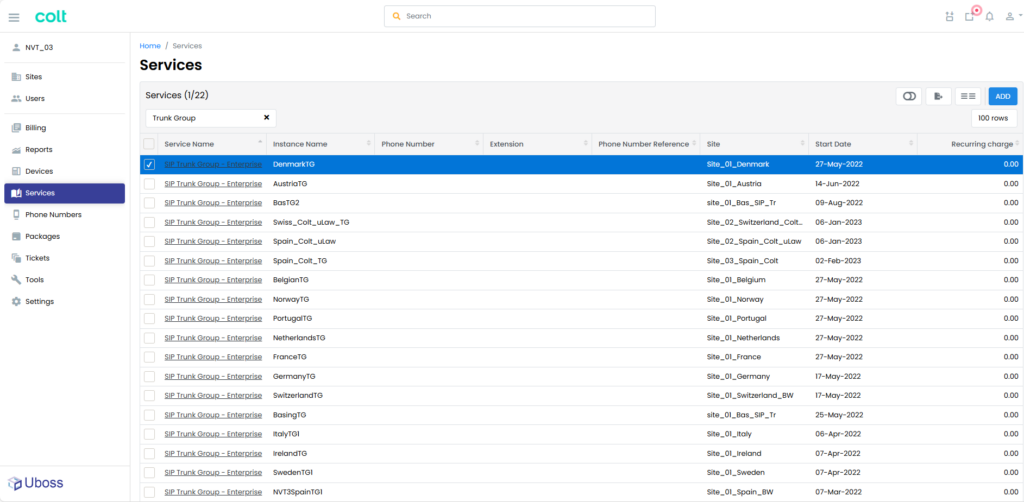
The Trunk Group Enterprise will be displayed.
Scroll to the Call Forwarding Always section and select:
– Forward To Phone Number / SIP-URL – to forward to a number
– Reroute to Trunk Group – to select another Trunk Group (if available)
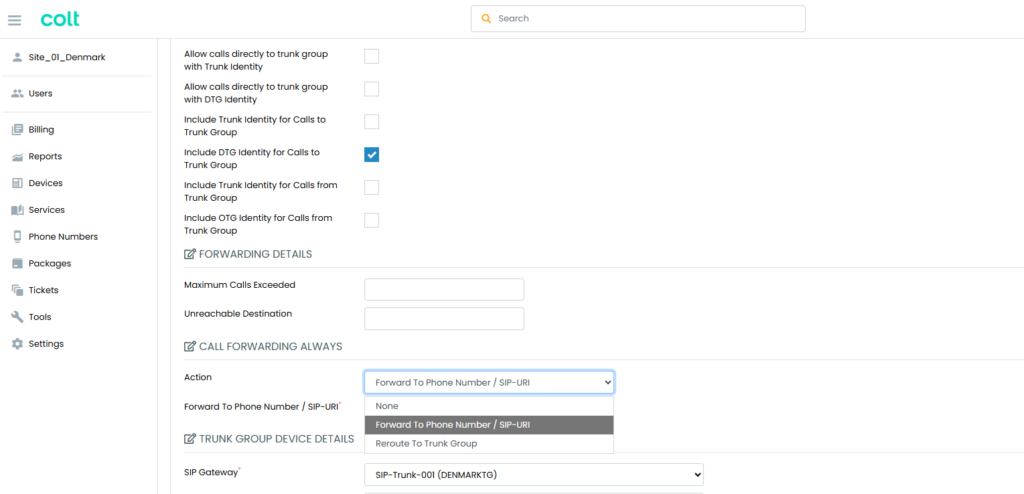
Forward To Phone Number / SIP-URL
For the forward to phone number option enter, in E164 format, the telephone number to forward calls to, into the Forward To Phone Number / SIP-URL field
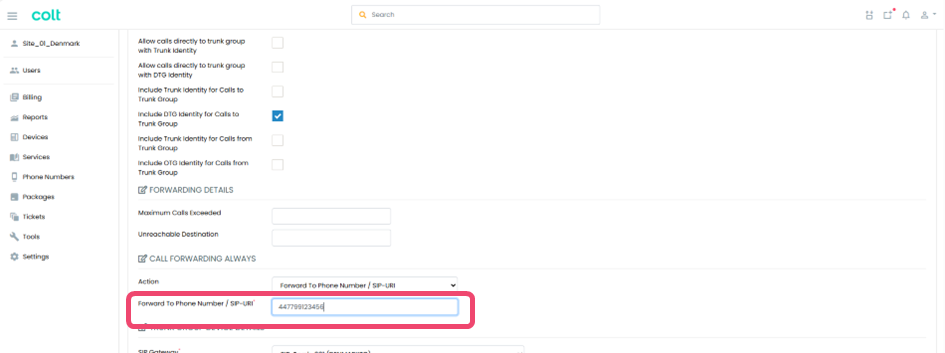
Select to apply the call forward
Reroute to Trunk Group
Where multiple Trunk Groups are available in the country, it is possible to reroute to an alternative Trunk Group. Select the Reroute to Trunk Group option and then select the desired Trunk Group from the Reroute to Trunk Group field.
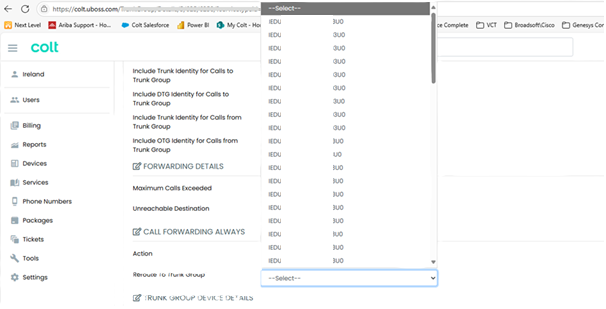
Select to apply the call forward
Simultaneous Ring
The Simultaneous Ring service is a user “find-me” service that alerts multiple terminating locations simultaneously when a call is presented to the host number. A user can provision up to ten secondary terminating locations.
Setting Simultaneous Ring
To configure, navigate to the user that requires Simultaneous Ring to be configured and select Service Configuration from the left hand navigation
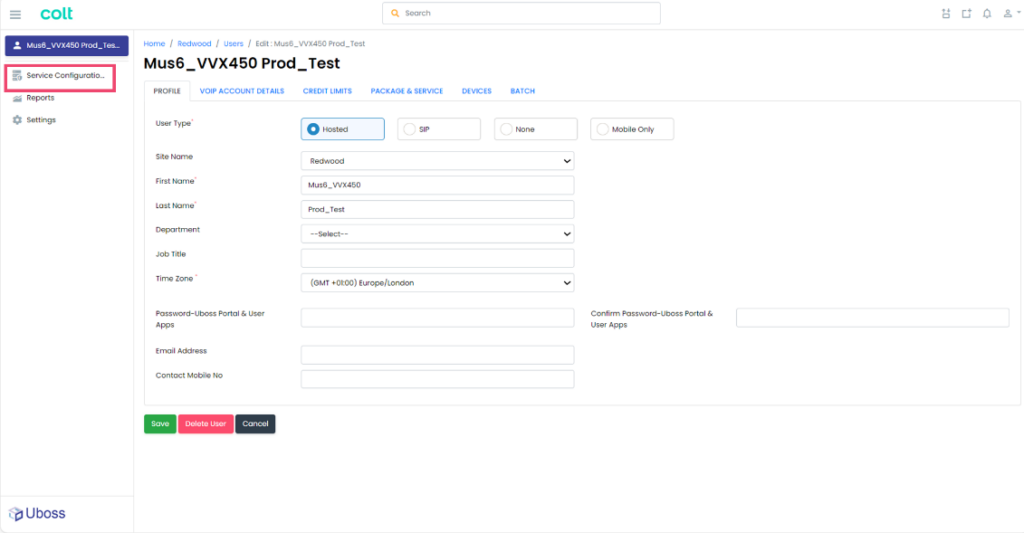
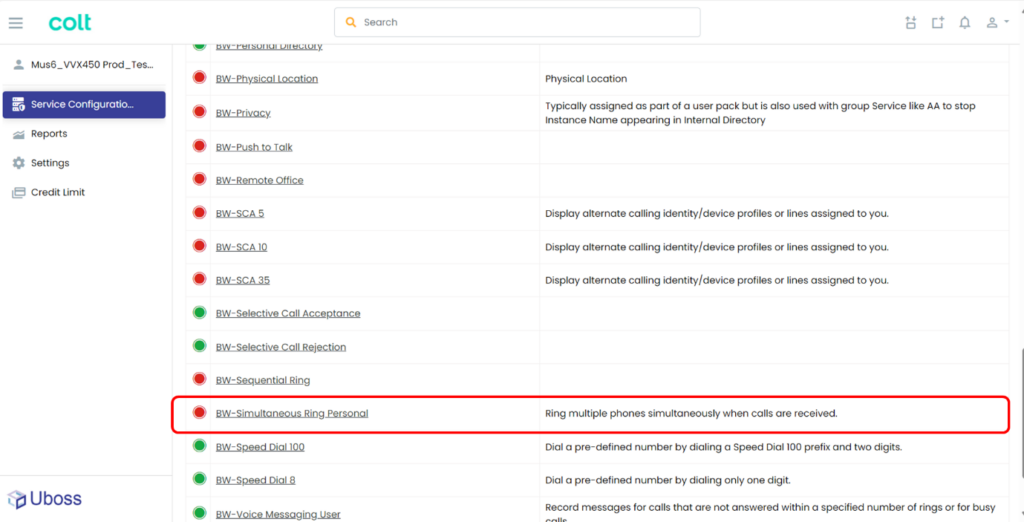
Select the Simultaneous Ring option.
Select the desired option for incoming call treatment from the dropdown
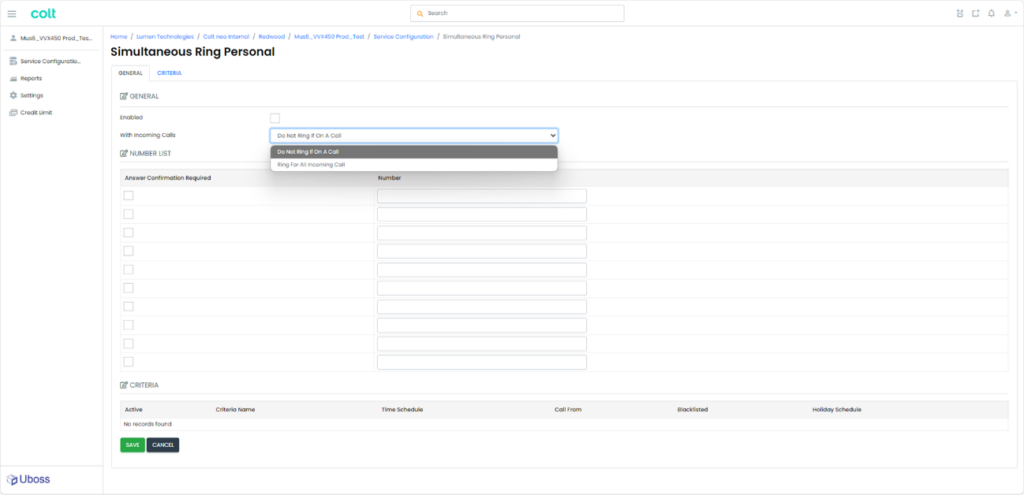
Enter the telephone number(s) that calls should simultaneously ring and check the ‘Enabled’ box and select ![]() to activate the service. (To deactivate the service simply uncheck the ‘Enabled’ box and select Save).
to activate the service. (To deactivate the service simply uncheck the ‘Enabled’ box and select Save).
Simultaneous Ring Criteria
It is possible to apply criteria, whether that be determined by a schedule or telephone number, to determine whether the incoming call follows the simultaneous ring settings or not. By default, all calls will follow the settings but to change, select the Criteria tab
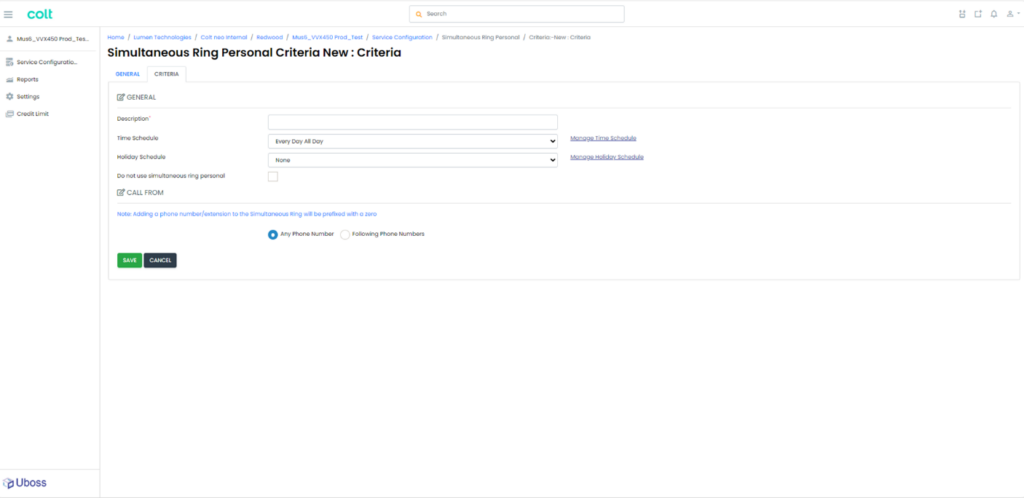
Enter a friendly description and amend the options as required.
Refer to Setting Schedules for details of how to create schedules
When completed select ![]() for the settings to be applied.
for the settings to be applied.
Sequential Ring
Sequential Ring allows users to define a “find-me” list of phone numbers, which when the number is called all destinations will be alerted in the specified order based on associated criteria of calling number, number type and time of day. The destinations are configured by telephone number, so they can be both internal and external.
Setting Sequential Ring
To configure, navigate to the user that requires Sequential Ring to be configured and select Service Configuration from the left hand navigation
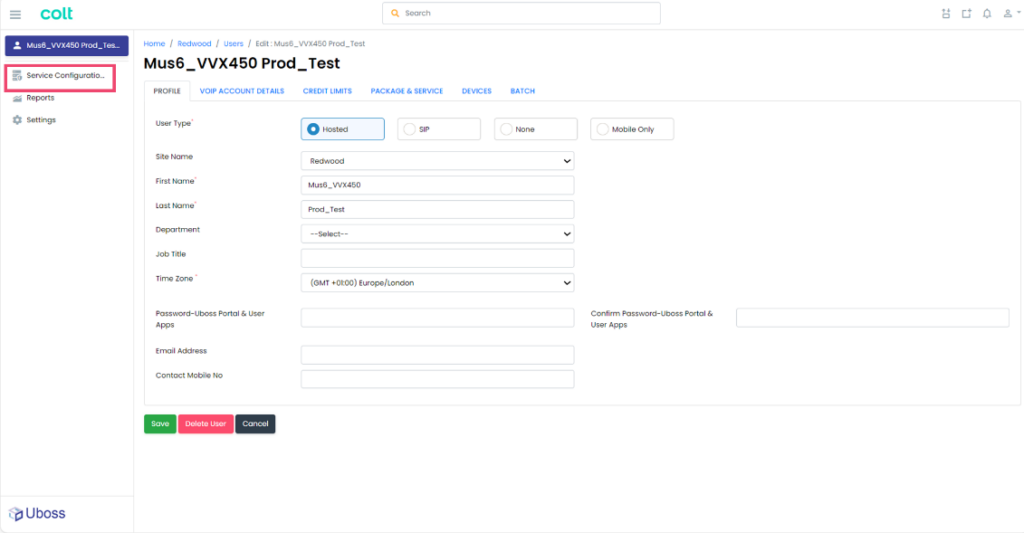
Select the Sequential Ring option.
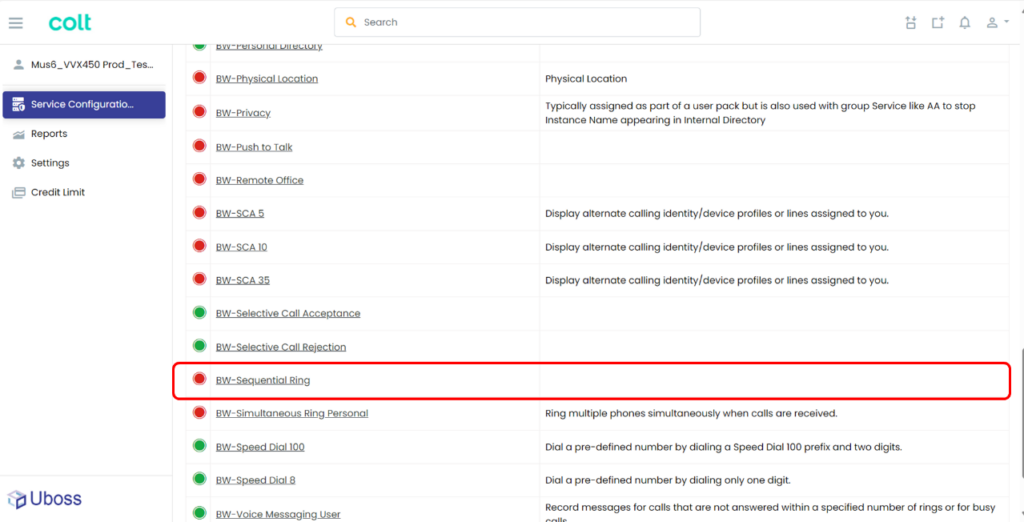
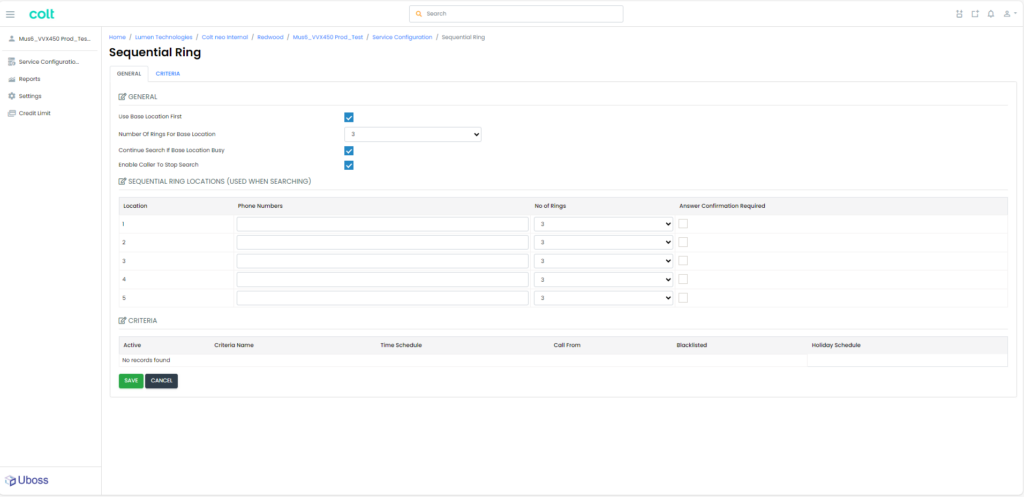
Select the desired options for the sequential search and enter the telephone number(s) that calls should sequentially ring and select ![]() to activate the service.
to activate the service.
Sequential Ring Criteria
It is possible to apply criteria, whether that be determined by a schedule or telephone number, to determine whether the incoming call follows the simultaneous ring settings or not. By default, all calls will follow the settings but to change, select the Criteria tab
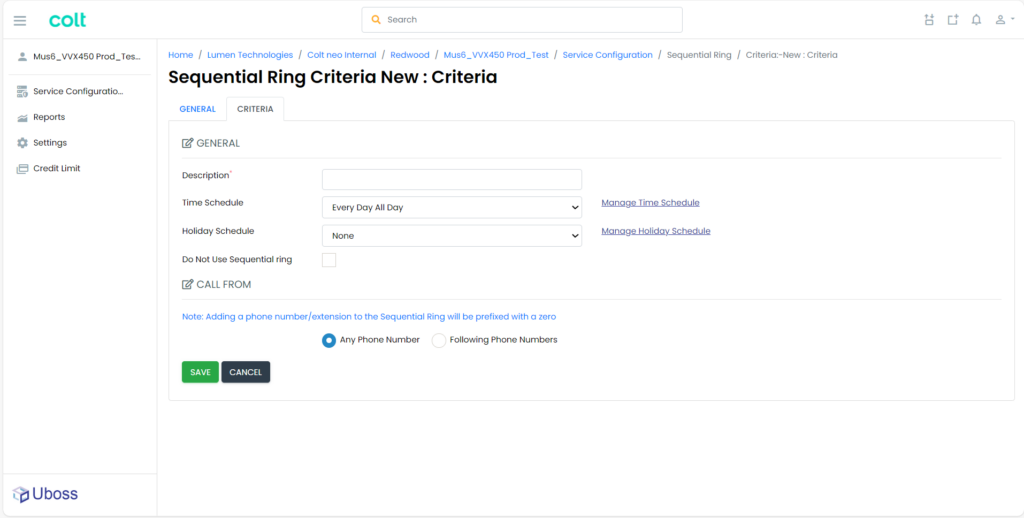
Enter a friendly description and amend the options as required.
Refer to Setting Schedules for details of how to create schedules
When completed select ![]() for the settings to be applied.
for the settings to be applied.
Setting Schedules
Setting Holiday and Out of Hours Schedules
From the left hand menu select Settings and scroll to the Schedules section
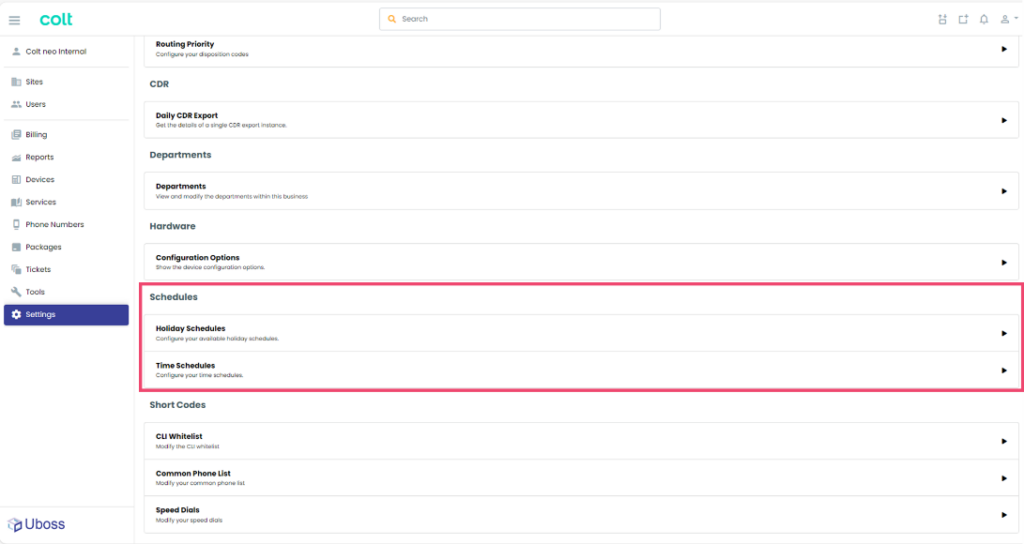
Time Schedules
Select Time Schedules and select the ![]() button to reveal the schedule options
button to reveal the schedule options
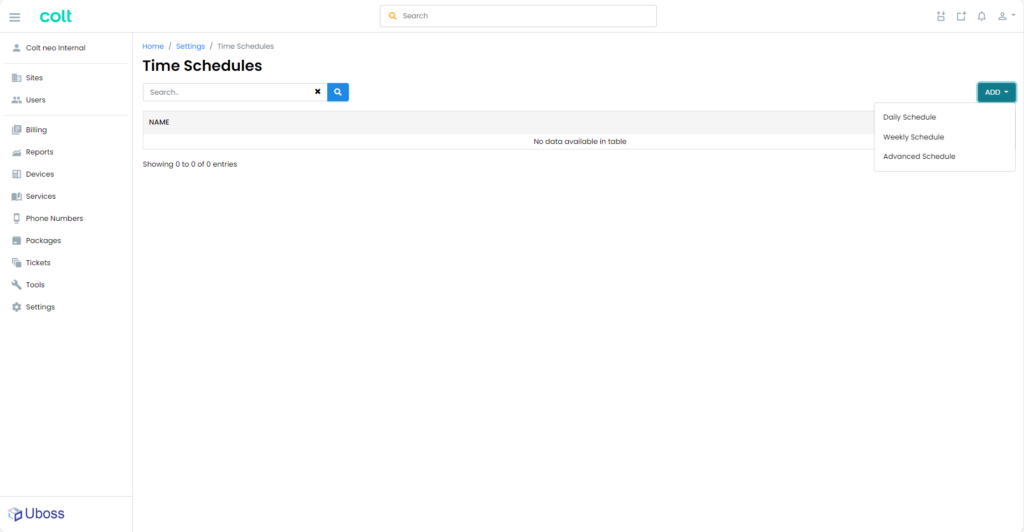
To configure the out of hours times, select Weekly Schedule and on the next screen add a schedule name.
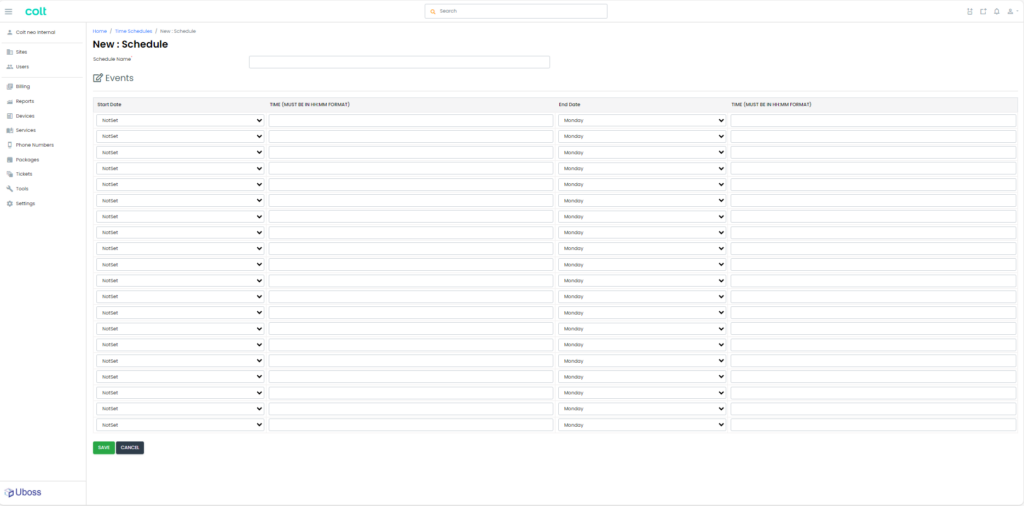
For out of hours, insert the times for Monday through to Friday (Saturday and Sunday too if required).
Note: if the start date is Monday, then the end date will be Tuesday etc. For out of hours the start time needs to be one minute after the opening hour’s end time and one minute before the opening hour’s start time. If the business is closed over the weekend remember that Friday’s start date will have Monday as the end date, as in the example below.

Once details are completed press ![]()
Holiday Schedules
Select Holiday Schedule from the schedule options and select the ![]() button to reveal the schedule options
button to reveal the schedule options
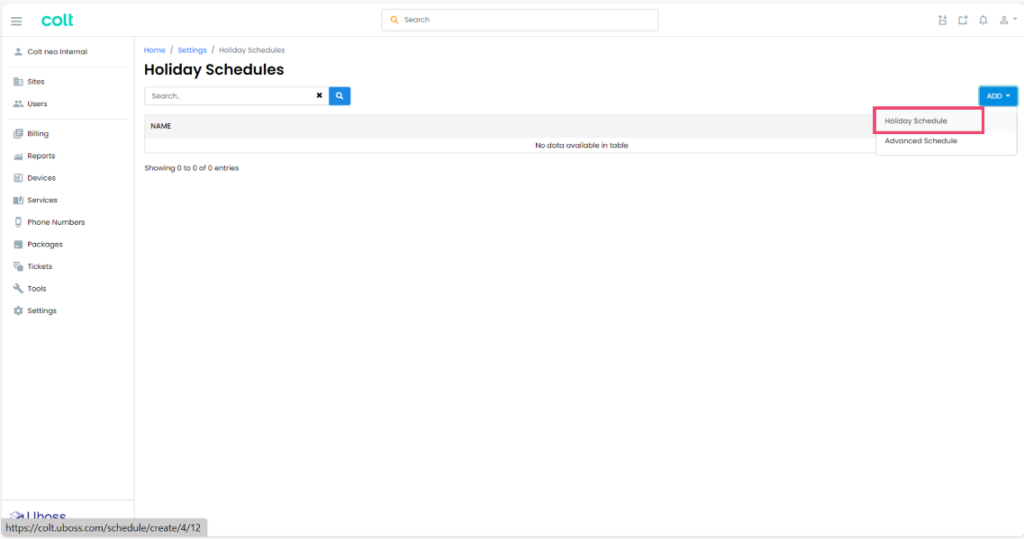
Select Holiday Schedule to reveal the configuration page
Enter a name for the Schedule e.g. 2023 Public Holidays
Complete the Event Name, if appropriate, tick the All Day Event box, select the start date and the end date.

Once details are completed press ![]()
Adding Holiday schedules to Auto Attendant
From the left-hand menu bar select ‘Assignments – Service Assignments’ to show the assigned services
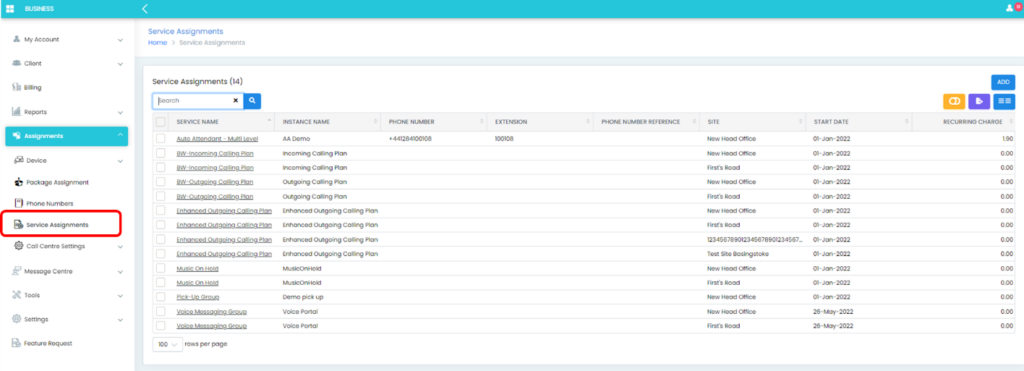
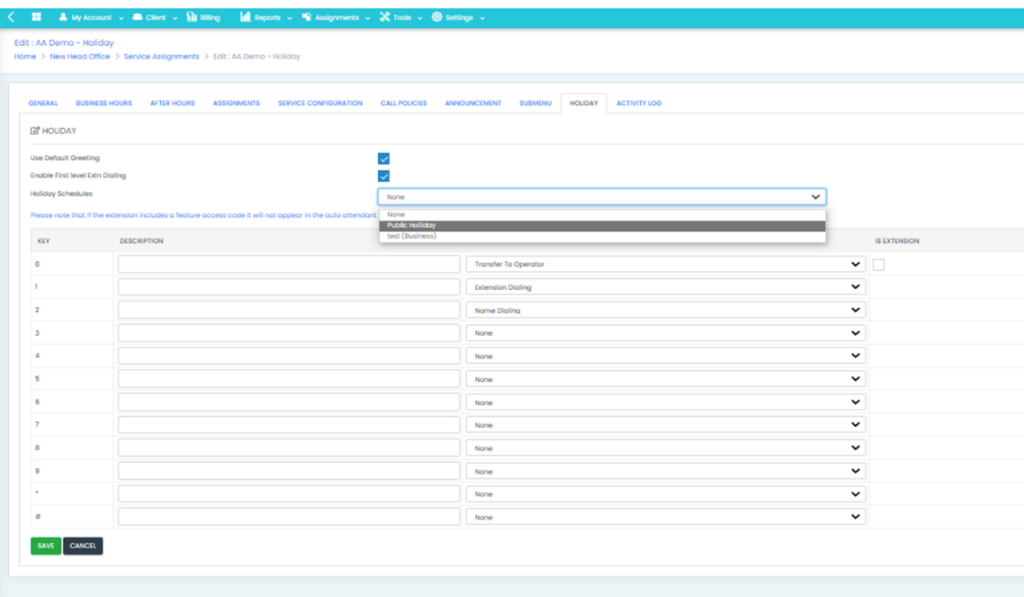
Select the required Auto Attendant service and from the menu bar select Holiday

The Holiday page is now presented. From the Holiday Schedules drop down select the required Holiday schedule.
Adding a schedule to the Call Forward Selective service
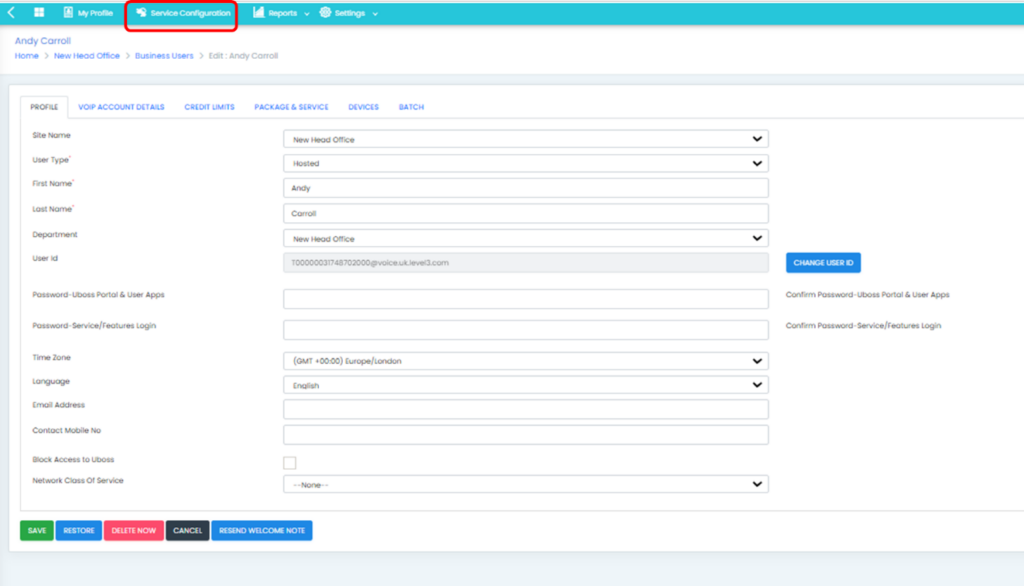
Select the user or service e.g. Hunt Group with the Call Forward Selective service and select Service Configuration from the top menu bar
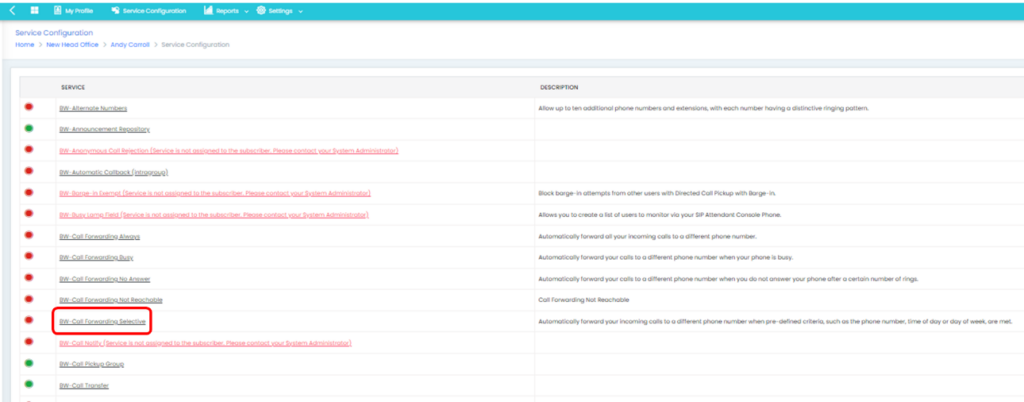
Select the Call Forwarding Selective service from the service list
Select the Criteria tab, add a Name and select the required schedules from the Time schedule and Holiday schedule dropdown options as required.
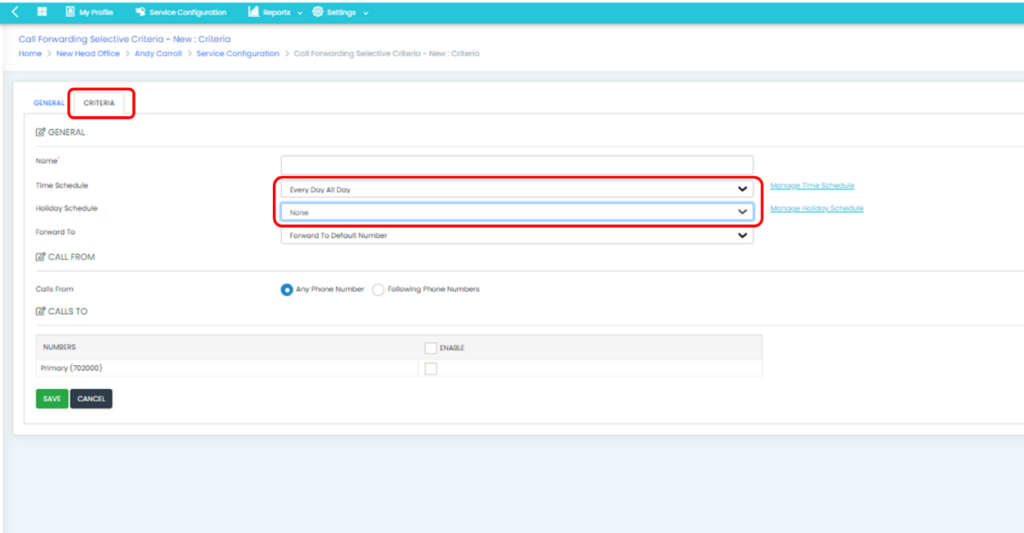
Complete other settings as required and select ![]()
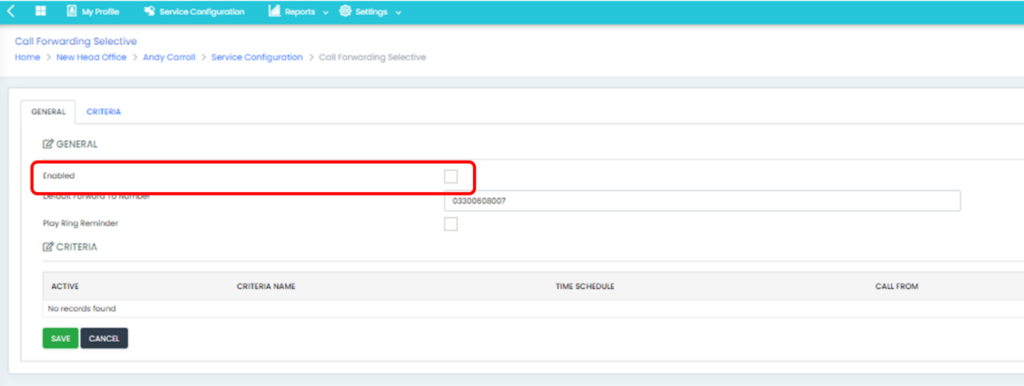
To activate the Call Forwarding Selective service, select the Enabled box in the General tab and then select ![]()
Blocking Calls from specific numbers
Where a user wishes to block calls from certain calling numbers the Selective Call Rejection service is used. This service enables a user to define criteria that causes certain incoming calls to be rejected and is particularly useful where an individual is being targeted by spam or other unwanted calls.
It is also possible to block calls at a site level. Setting numbers to block at this level will stop calls to all users configured on that site, being more beneficial when multiple users are being targeted.
Activating User Level Blocking
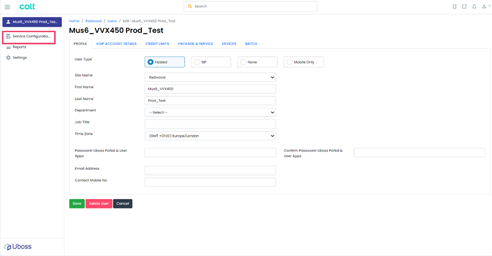
Navigate to the user that requires calls to be blocked and select Service Configuration from the left hand navigation
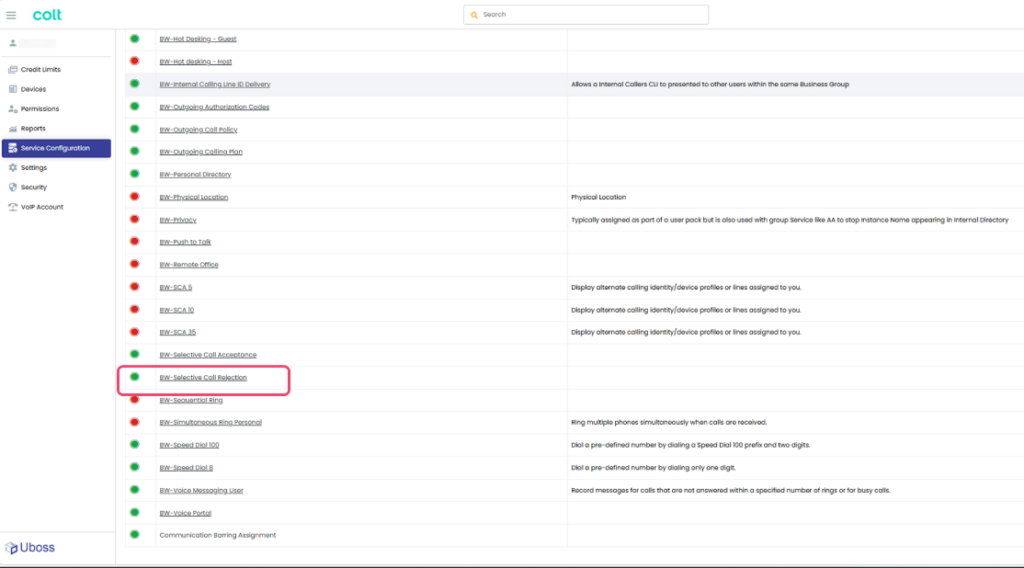
Select the Selective Call Rejection option.
And select

This will take you to the New Criteria page where the details of the number(s) you wish to block and the criteria followed are set. Select ‘Following Phone Numbers‘ to block individual numbers and ”Any Phone Number‘ to block all inbound calls.
Complete the information and select to apply the blocking
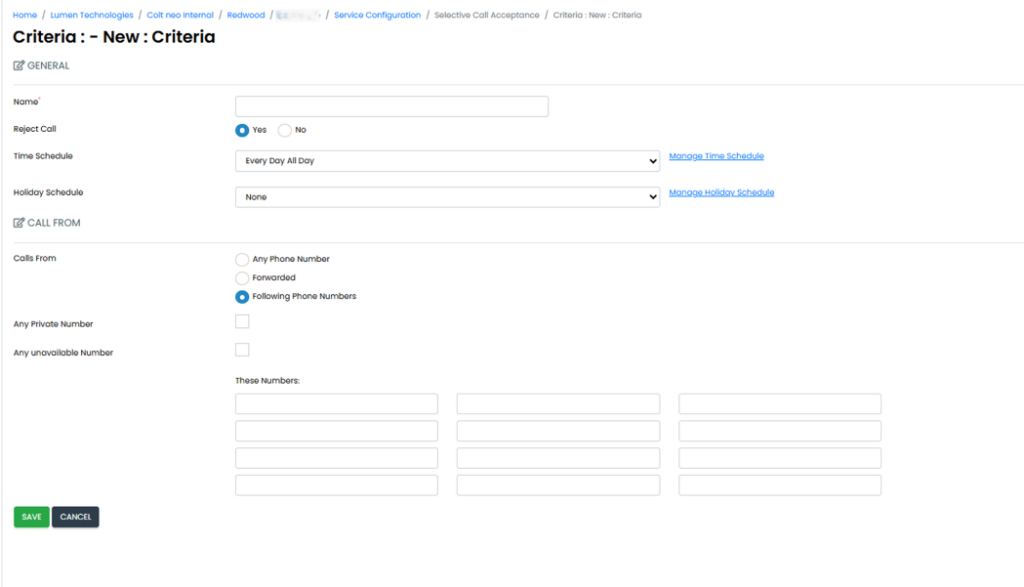
Editing Blocked Call criteria
If it is required to edit the blocked calls, navigate to the Selective Call Rejection service for the user and select the required criteria.

This will take you to the criteria settings page where the details can be amended.
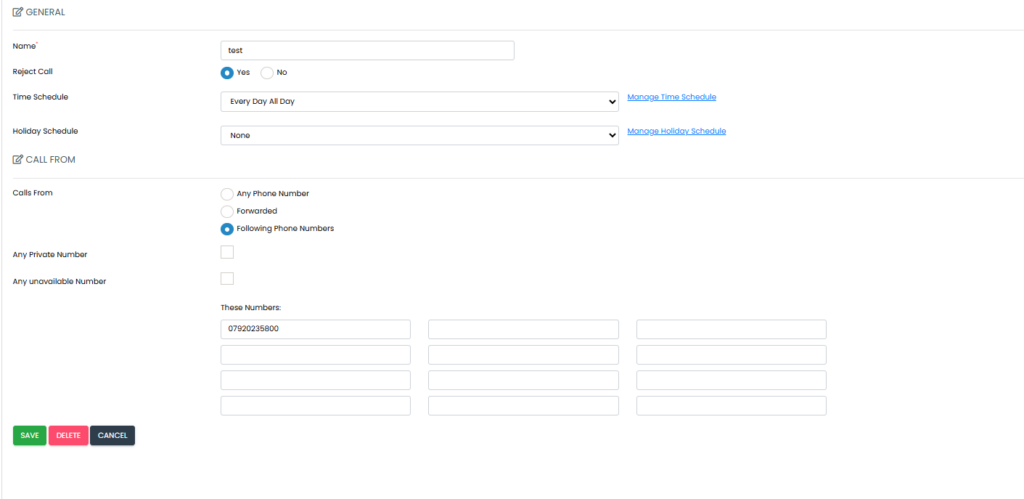
Remember to select to make the changes.
To remove the blocking select and ‘Yes’ from the following confirmation box
Activating Site Level Blocking
Navigate to the required site and select Settings from the left hand menu
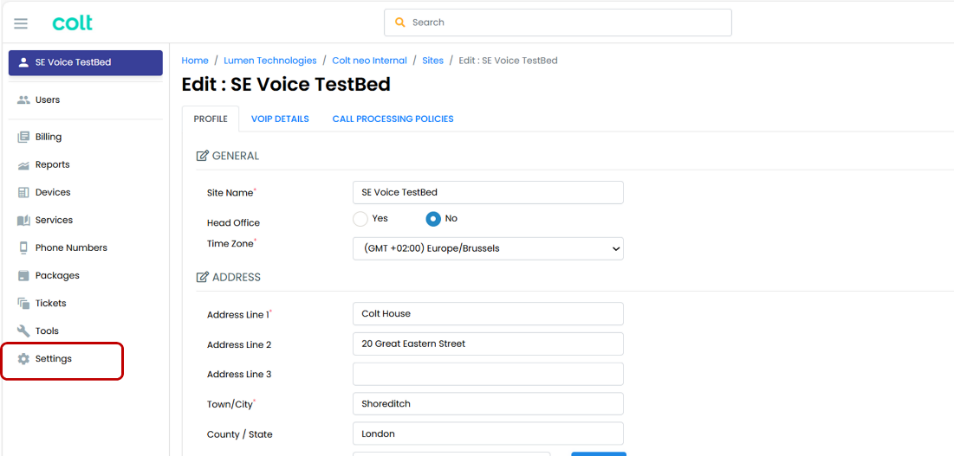
From the Settings menu select Blocked Calls
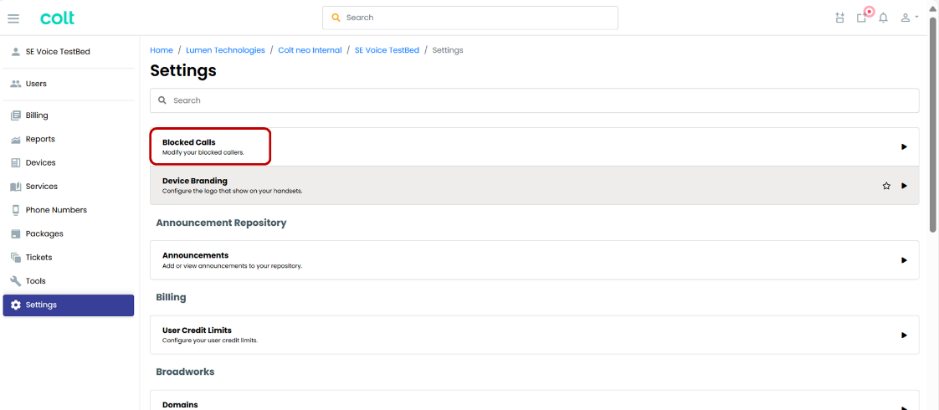
Select from the Blocked Calls – General tab
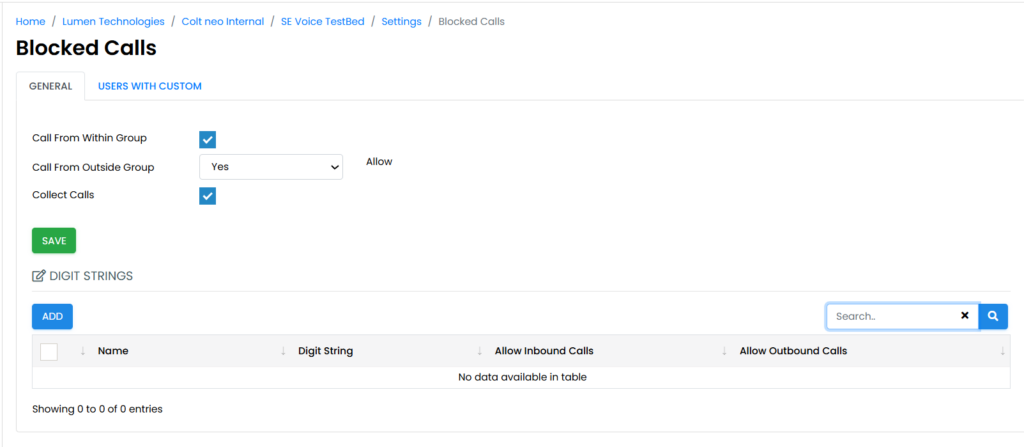
And enter the required data:
Name – a friendly name to identify what is being blocked
Digit String – the telephone number that is to be blocked
The remaining boxes will normally be left unchecked however should it be required to block inbound calls to an internal number but allow it to make calls out, the Allow Outbound Calls should be checked
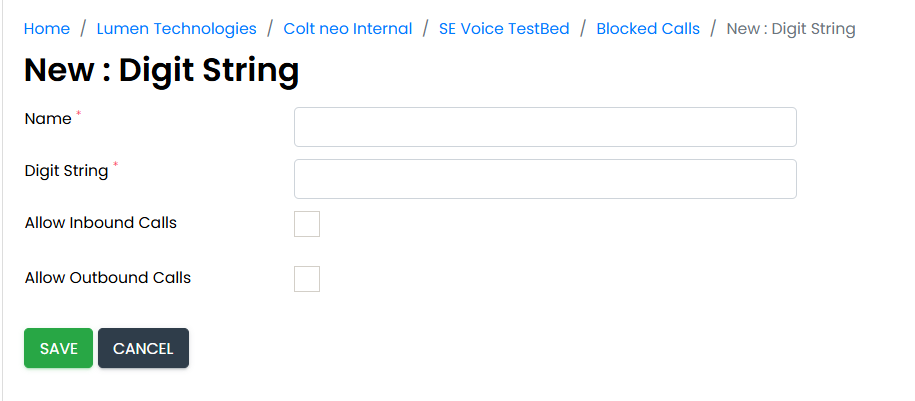
Remember to select to make the changes.
Cisco Webex
Adding Webex to an existing User
Navigate to the User menu by selecting Users from the left-hand navigation bar

Then click on the user you wish to add Webex to

On the Profile tab enter the users email address into the email address field
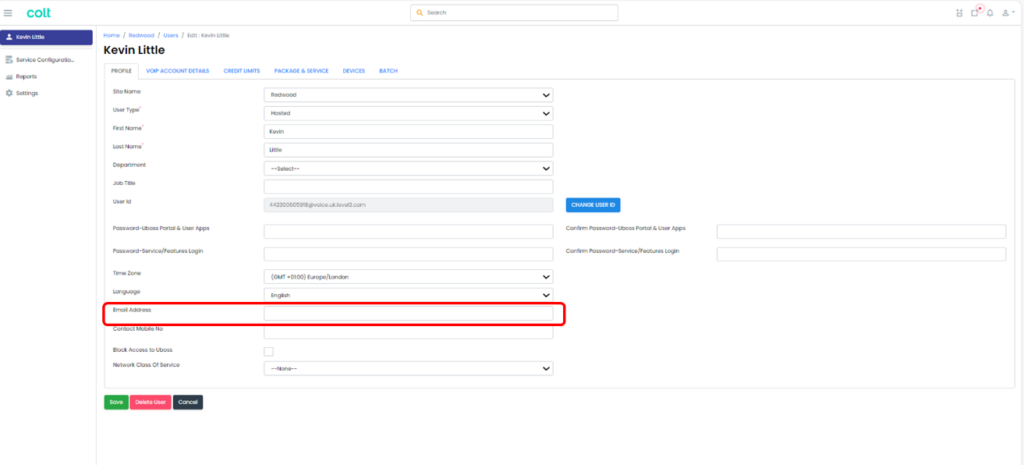
Note: DO NOT INCLUDE any capital letters in the email address!
Webex needs a Webex unique email address so, if the users email already exists in Webex, an error message will be returned. Removal of the email from Webex will be required to activate onto the VCT platform.
A password can be set in the “Password-Uboss Portal & User Apps” field. If no password is entered the system default will be applied
Click ![]() to save the details
to save the details
From the Package and Service tab, select the required Webex package
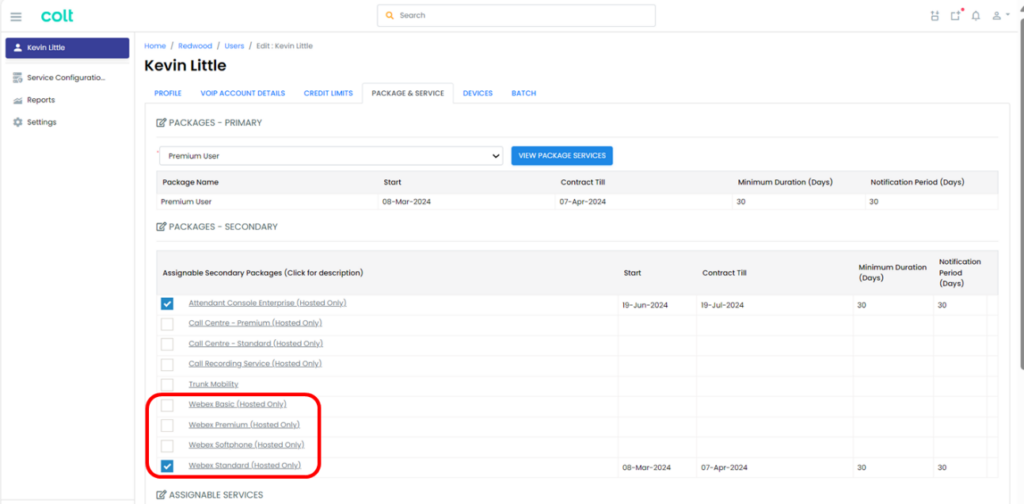
Webex Packages
| Package | Calling | Messaging | Space Meetings | Personal Meeting Room (PMR) Meetings |
| Softphone | Included | Not Included | None | None |
| Basic | Included | Included | 25 participants1 | None |
| Standard | Included | Included | 100 Participants | 100 participants |
| Premium | Included | Included | 300 Participants | 1000 participants |
Once completed click ![]() to complete the activation.
to complete the activation.
The Webex devices will now be present in the Devices menu

Reports
Viewing Itemised billing data
UBOSS contains all the billing data and allows the customer administrator to view each months itemised billing information.
Full-Service itemisation – Business
Navigate to the Reports menu in the left hand navigation bar.
Scroll to Services and select the Service Detail – Businessreport
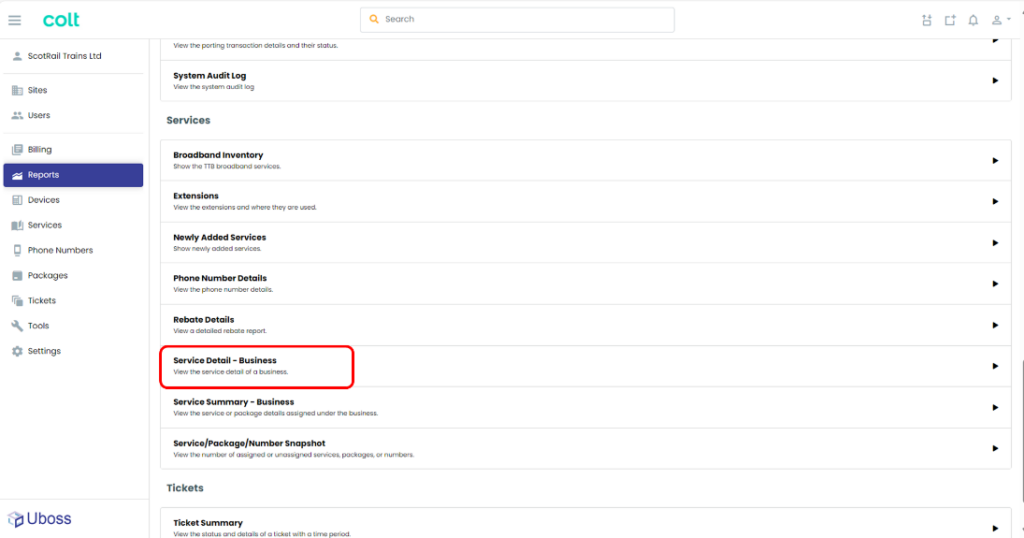
Select the billing month you wish to see from the Invoice Month dropdown and select ![]()
The full detail for that billing month will be displayed

The report shows ALL items regardless of whether they are actually charged and depending upon the size of the estate, some data may not show on screen however, the download button (![]() ) will create a CSV file containing the complete data set where filters can be used to view specific data.
) will create a CSV file containing the complete data set where filters can be used to view specific data.
Phone Number Billing
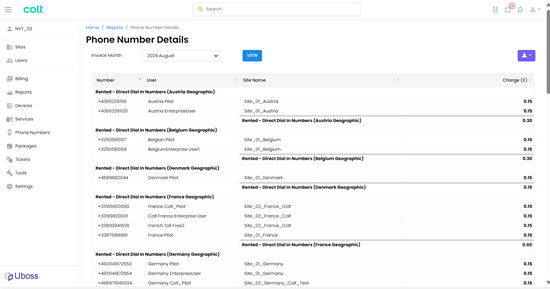
Where SIP trunks are deployed, monthly telephone number charges can be viewed through the Phone Numbers Detail report which is found in the Services section of the Reports menu.
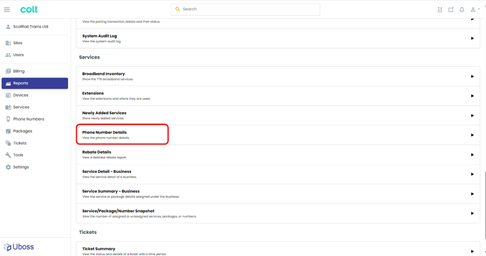
Select the billing month you wish to see from the Invoice Month dropdown and select ![]()
The full detail for that billing month will be displayed
Summary Billing Data
It is also possible to view a summary of the billing data
Navigate to the Reports menu in the left hand navigation bar.
Scroll to Services and select the Service Summary – Business report
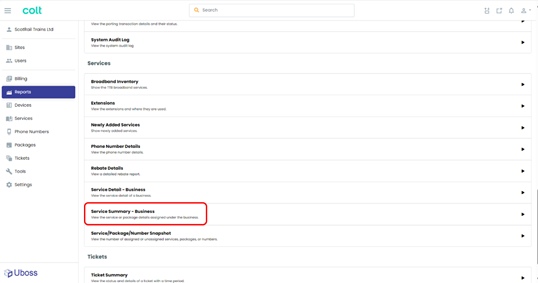
Select the month you wish to see from the Invoice Month dropdown and select ![]()
A summary of charges for that month will be displayed, this time split between Packages and Services

The download button (![]() ) can be used to download the information to a CSV file for further analysis.
) can be used to download the information to a CSV file for further analysis.
Department and Site breakdown reporting
Assigning departments and aligning users to those departments is a useful way of segmenting costs for internal reporting and allocation. Once departments are assigned, charges can be reported.
Navigate to the Reports menu in the left hand navigation bar.
Scroll to Combi and select the Summary by Department report
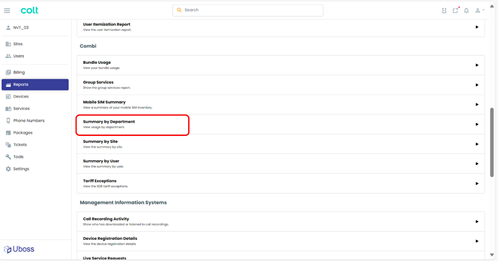
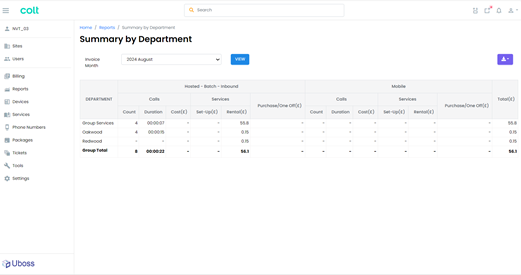
Select the billing month you wish to see from the Invoice Month dropdown and select ![]()
The full detail for that billing month will be displayed
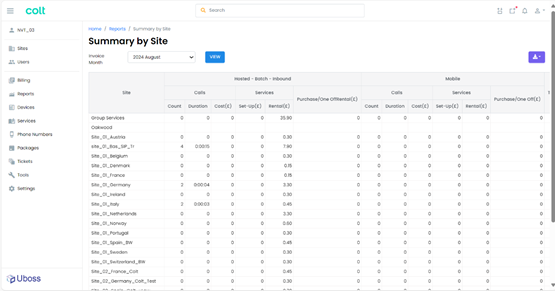
Similarly, by selecting the Summary by Site report charge detail is provided for each configured Site
Call Reports
UBOSS reporting provides a number of useful call reports accessible from the Reports on the left-hand navigation bar.
Navigate to Reports and scroll to the Calls section to view the available reports and select Call Logs
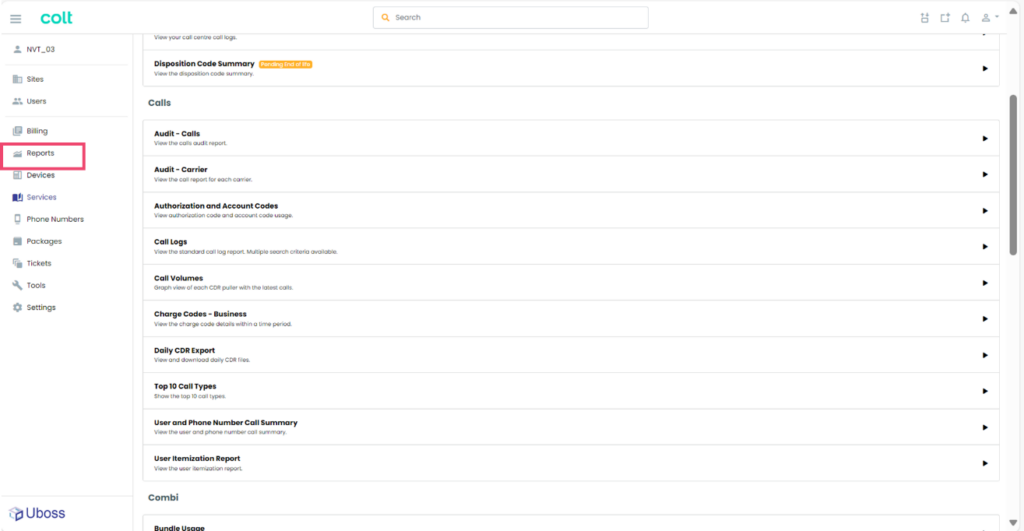
This will present the call log filter criteria page
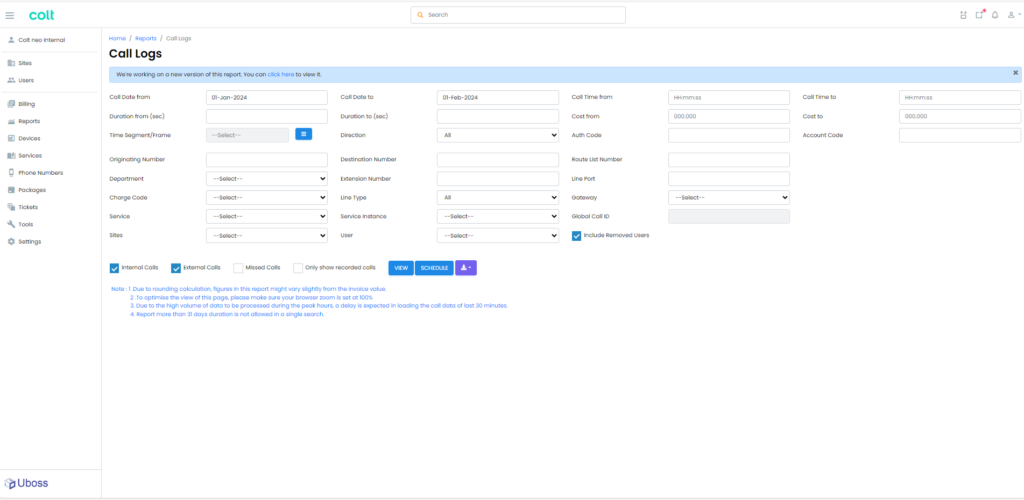
If required, select or enter the filter criteria for the desired call search.
Press ![]() for the associated calls to be displayed.
for the associated calls to be displayed.
The ![]() will export the report to a csv file.
will export the report to a csv file.
It is also possible to schedule a report either directly in the Reports>Schedule menu or by pressing the ![]() button from within the report and entering the relevant schedule requirements.
button from within the report and entering the relevant schedule requirements.
Widget and Hot Buttons
Dashboard Widgets
UBOSS Dashboard is a home screen for every user that can be configured with widgets to display information relevant to that user. Depending on the widget, information can be toggled to display either the last 7 or 15 days of data.
Widgets can be added or removed from view by selecting the ![]() button from the Home Screen
button from the Home Screen

And toggling on or off the required widget.

Available widgets are:
- Users – Displays the total count of the different types of users on platform
- Ticket Updates – Provides a feed of the latest submitted tickets
- Charges – Summary of charges over the past 6 months
- Call Volume Count – Summary of call counts inbound and outbound for the proceeding 7 or 15 days
- Call Volume Minutes – Summary of call minutes inbound and outbound for the proceeding 7 or 15 days
- Notifications – displays any portal notifications added
- Auto Attendant – displays Auto Attendant data from a selection drop down
Hot Buttons
Hot Buttons within the Dashboard are user defined short cuts to specific pages within UBOSS or to external url’s. This is an extension of the widgets concept of personalising UBOSS for an individual user.
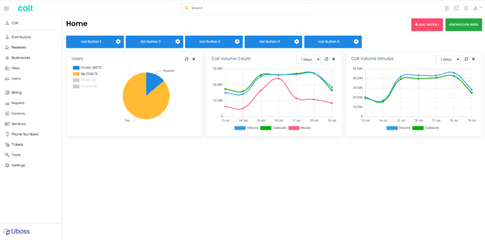
To configure a Hot Button, click on the cog next to an available Hot Button. This will pop out the configuration box, as shown below.
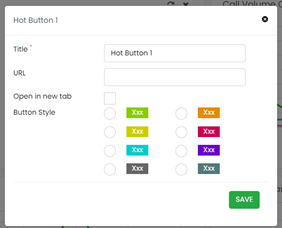
Enter what you would like the button to be called and paste in the URL that you would like it linked to.
You have the option to choose whether it opens a new tab when clicked and to also personalise the colours.
Remember to click ![]() for the settings to take effect
for the settings to take effect
Cloud Communications – Feature Codes
| Service | Feature Access Code |
| Call Forwarding Always Activation | *72 – “Forwarding Number” Note: if no forward number entered, previously configured number is used. |
| Call Forwarding Always Deactivation | *73 |
| Call Forwarding Always Interrogation | *21* |
| Call Forwarding Always To Voice Message Activation | *21 |
| Call Forwarding Always To Voice Message Deactivation | #21 |
| Call Forwarding Busy Activation | *90 – “Forwarding Number” Note: if no forward number entered, previously configured number is used. |
| Call Forwarding Busy Deactivation | *91 |
| Call Forwarding Busy Interrogation | *67* |
| Call Forwarding Busy to Voice Message Activation | *40 |
| Call Forwarding Busy to Voice Message Deactivation | #40 |
| Call Forwarding No Answer Activation | *92 – “Forwarding Number” Note: if no forward number entered, previously configured number is used. |
| Call Forwarding No Answer Deactivation | *93 |
| Call Forwarding No Answer Interrogation | *61* |
| Call Forwarding No Answer To Voice Message Activation | *41 |
| Call Forwarding No Answer To Voice Message Deactivation | #41 |
| Call Forwarding Not Reachable (Disaster Recovery) Activation | *94 – “Forwarding Number” Note: if no forward number entered, previously configured number is used. |
| Call Forwarding Not Reachable Deactivation | *95 |
| Call Forwarding Not Reachable Interrogation | *63* |
| Group Call Pickup | *98 |
| Call Waiting Interrogation | *53* |
| Call Waiting Persistent Activation | *43 |
| Call Waiting Persistent Deactivation | #43 |
| Cancel Call Waiting | *70 |
| Clear Voice Message Waiting Indicator | *99 |
| Directed Call Pickup | *97 – “Extension number to answer” |
| Directed Call Pickup with Barge-in | *33 – “Extension number to answer” |
| Direct Voice Message Transfer | *55 |
| Find-me/Follow-me Call Push | *26 |
| Flash Call Hold | *22 |
| Last Number Redial | *66 |
| Speed Dial 100 | *75 – “speed dial position (00-99)” – “phone number to associate” |
| Speed Dial 8 | *74 – “speed dial position (2-9)” – “phone number to associate” |
| Voice Message Retrieval | *86 |
| Voice Portal Access | *62 |
